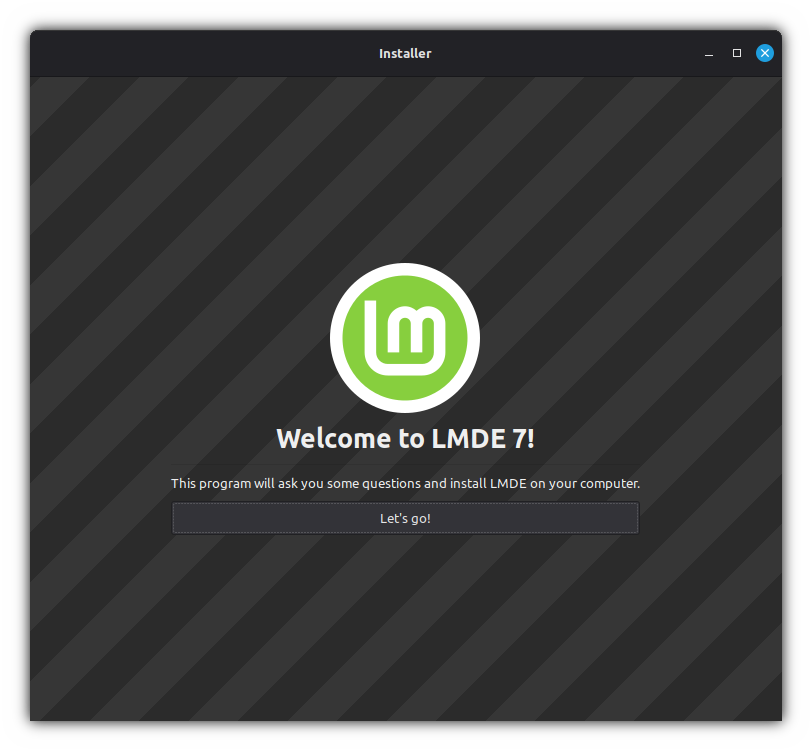
Installing LMDE 7 (Gigi) with full disk encryption using RAID1 (mdadm), LUKS2, LVM2, UKI, systemd-boot, and USB unlock

by Semyon A Mironov, 03.10.2025
This document describes the creation of the following scheme

Table of Contents
- Getting the current LMDE ISO image
- Clearing secure boot keys
- Booting from a LIVE-ISO
- Preparing a LIVE system
- Preparing the disks
- Installing the system
- Configuring the system
- Entering the system
- Removing packages
- Setting the timezone
- Setting the locale
- Configuring keyboard
- Setting up users
- Writing hostname
- Configuring MDADM
- Configuring LUKS
- Creating swap
- Writing fstab
- Configuring initramfs
- Converting APT source list to Deb822 format
- Configuring secure boot mode
- Configuring kernel build
- Configuring kernel command line
- Automatic ESP syncing
- Configuring the bootloader
- Updating initramfs
- Installing the video driver
- System upgrade
- Cleaning APT
- Exiting the chroot environment
- Unmounting the file systems of the installed system
- Rebooting the machine
- Checking the secure boot certificates
- Booting LMDE 7
- Using hibernation
- Emergency boot
- Useful links
Getting the current LMDE ISO image
Open the official Linux Mint project website: https://linuxmint.com
Navigate to the download page for the current/latest LMDE image
Click the download button
Select the Linux Mint repository mirror closest to your location and click the link to begin the ISO file download
Write the downloaded image to a USB drive:
Clearing secure boot keys
For security reasons, remove the existing certificates from the UEFI firmware to add your own certificates during the operating system installation.
Booting from a LIVE-ISO
To properly install the proprietary video driver, before booting the LMDE 7 Live image, disable the kernel-integrated video driver using the command line parameter for your video card:
nomodeset module_blacklist=amdgpu  # Modern AMD GPUs (GCN 1.0 architecture and newer)
nomodeset module_blacklist=i915    # Integrated Intel graphics (HD Graphics, Iris Xe, etc.)
nomodeset module_blacklist=nouveau # Most NVIDIA GPUs (GeForce, etc.)
nomodeset module_blacklist=radeon  # Older/Legacy AMD/ATI GPUs (pre-GCN)
The kernel’s command-line parameters Description quiet[KNL,EARLY] Disable most log messages splashLoad a splash image for XNU nomodesetDisable kernel modesetting. Most systems' firmware sets up a display mode and provides framebuffer memory for output. With nomodeset, DRM and fbdev drivers will not load if they could possibly displace the pre-initialized output. Only the system framebuffer will be available for use. The respective drivers will not perform display-mode changes or accelerated rendering.
Useful as error fallback, or for testing and debugging.module_blacklist[KNL] Do not load a comma-separated list of modules. Useful for debugging problem modules. Preparing a LIVE system
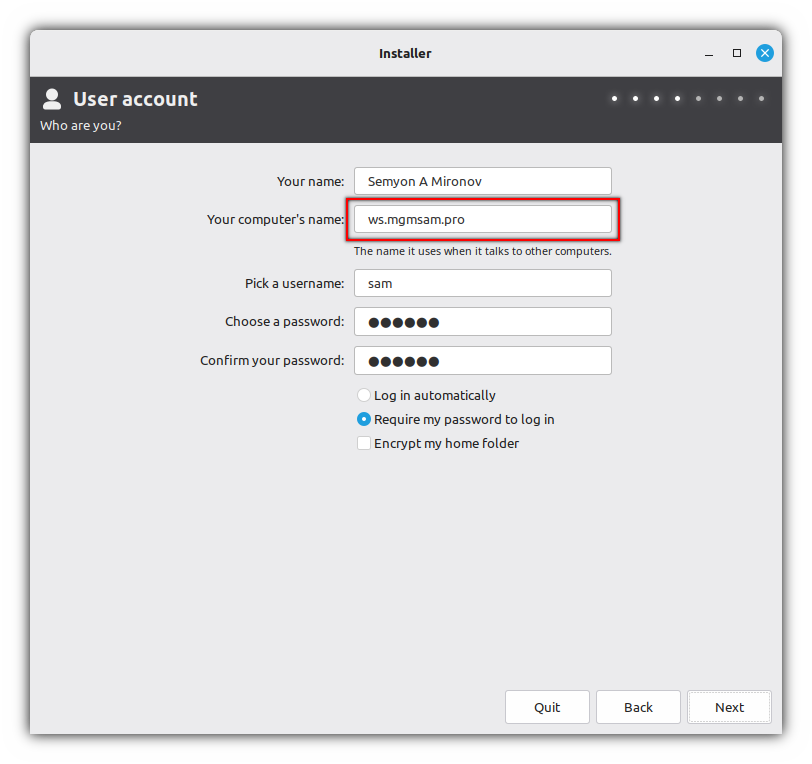
Further in this guide, a software RAID array with LVM2 will be created. In the future, to identify the host on which they were created, it is necessary to set the correct hostname and current date to save them in the disk subsystem metadata.
Changing the host name
Open the terminal:

Switch to the root user:
sudoSave the domain name in a variable:
export DOMAIN_NAME="mgmsam.pro"DOMAIN_NAMEvariable is required later for creating Secure Boot keys for UEFI.Save the new hostname in a variable:
export HOST_NAME="ws.$DOMAIN_NAME"Change the host name:
hostname "$HOST_NAME"Check the host name:
hostname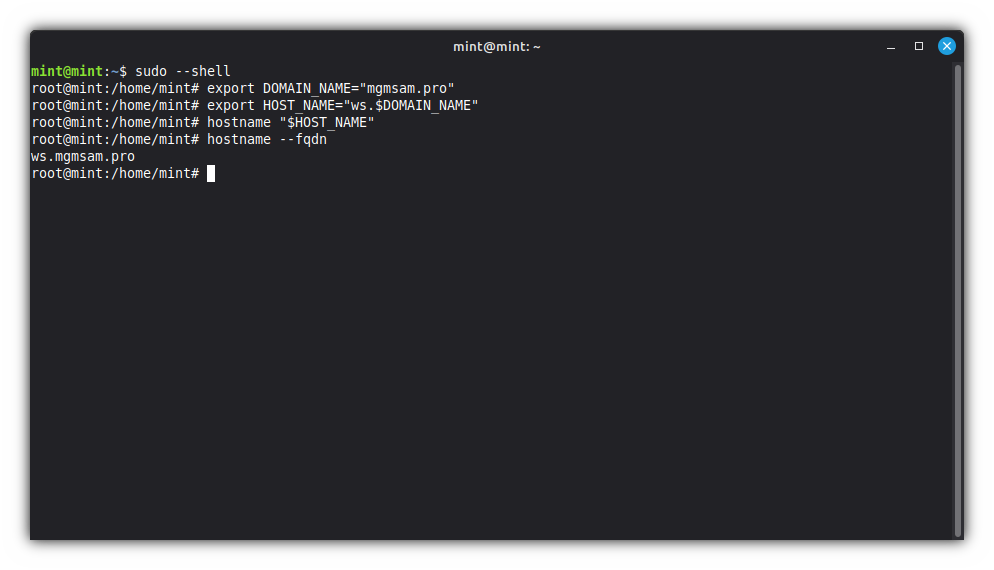
Additional commands
To display the new fqdn (fully qualified domain name) in the terminal
Edit the
PS1variable:sed '/^[[:blank:]]*PS1=/ s%\\h%\\H%' /home/mint/.bashrcSwitch to the root user again:
exitsudoInclude the new
.bashrc:. /home/mint/.bashrcResave the domain name and new hostname in a variable:
export DOMAIN_NAME="mgmsam.pro"
export HOST_NAME="ws.$DOMAIN_NAME"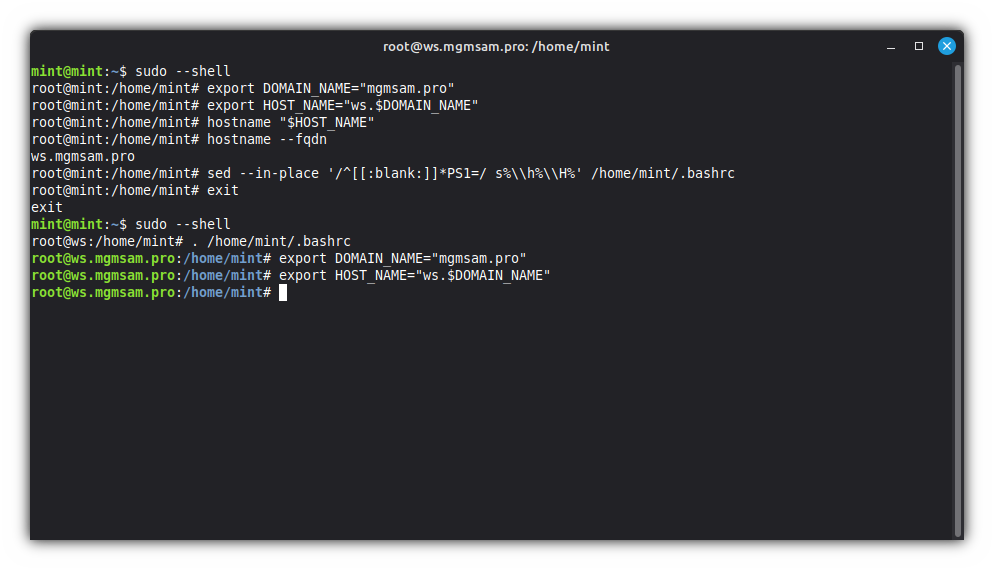
Setting up time in a LIVE system
Set the timezone:
dpkg-reconfigure tzdataSyncing the time:
service systemd-timesyncd restart
Preparing the disks
Creating partitions
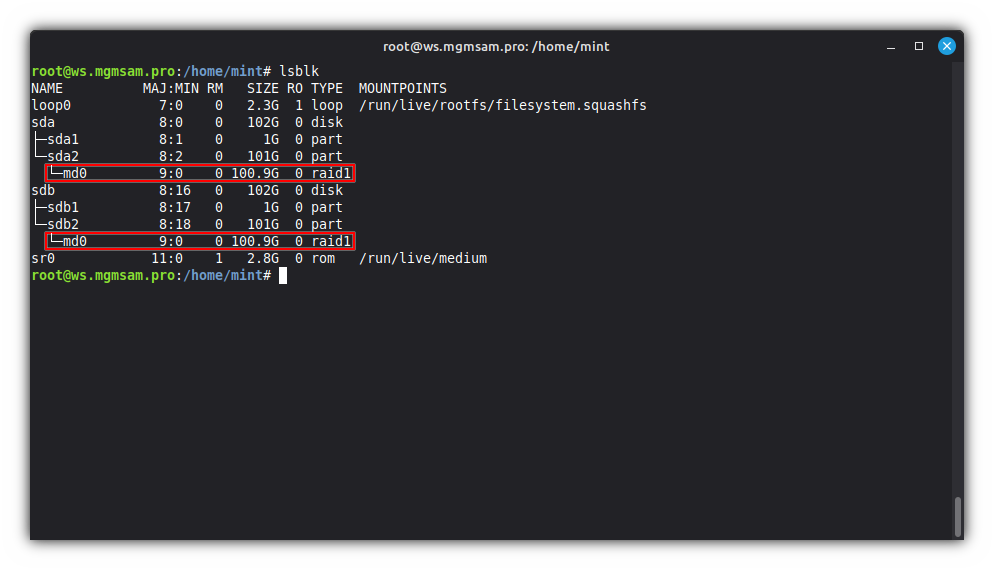
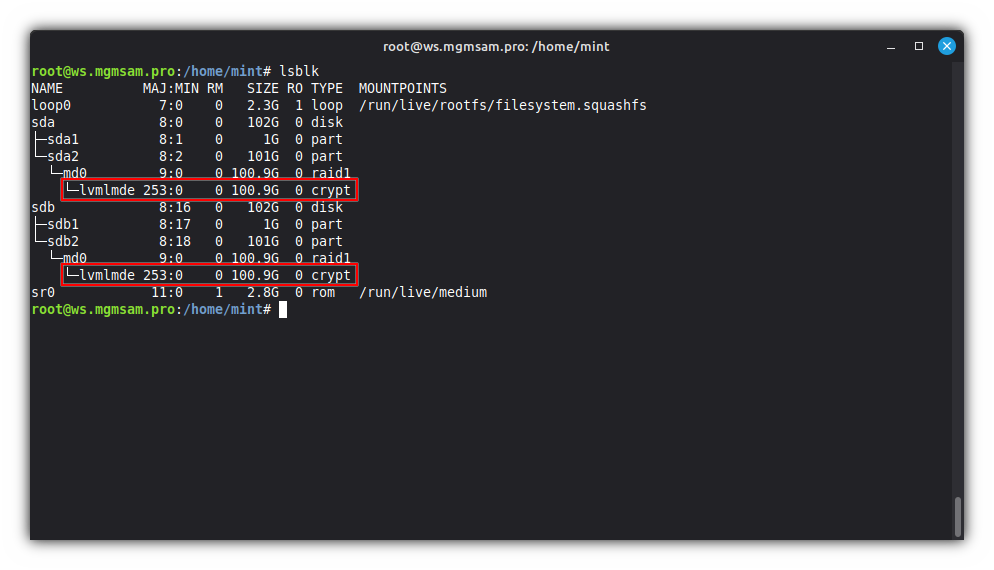
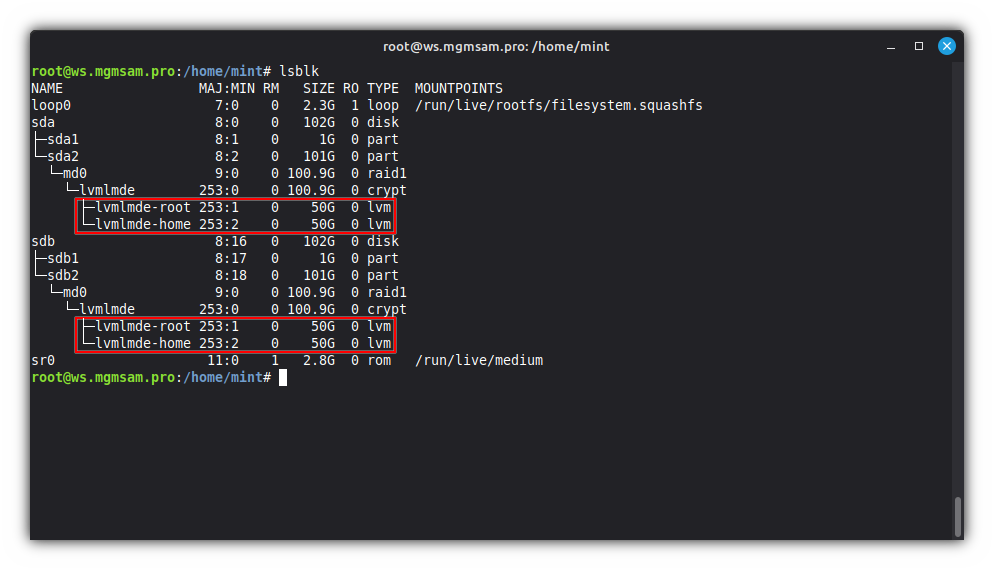
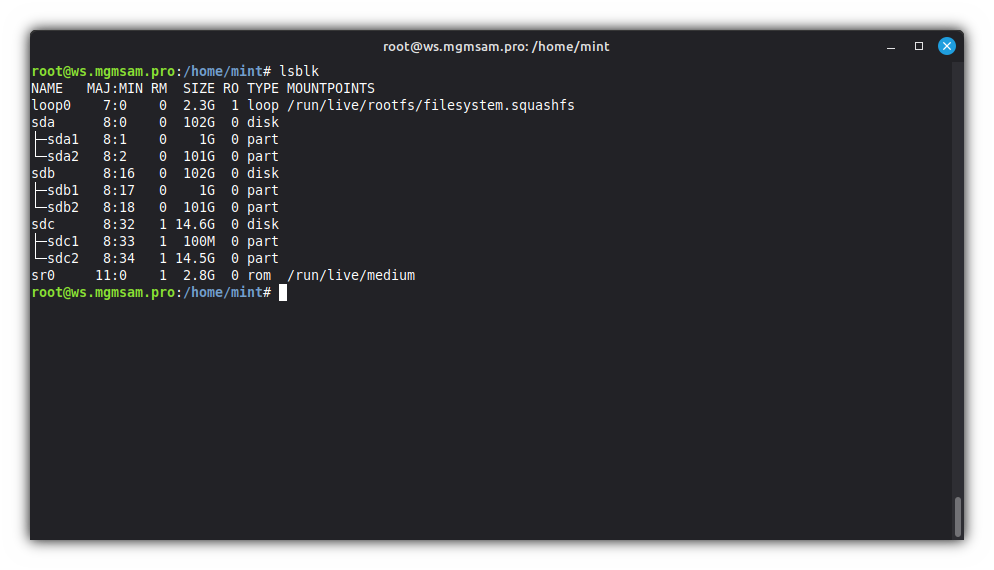
List information about block devices:
lsblk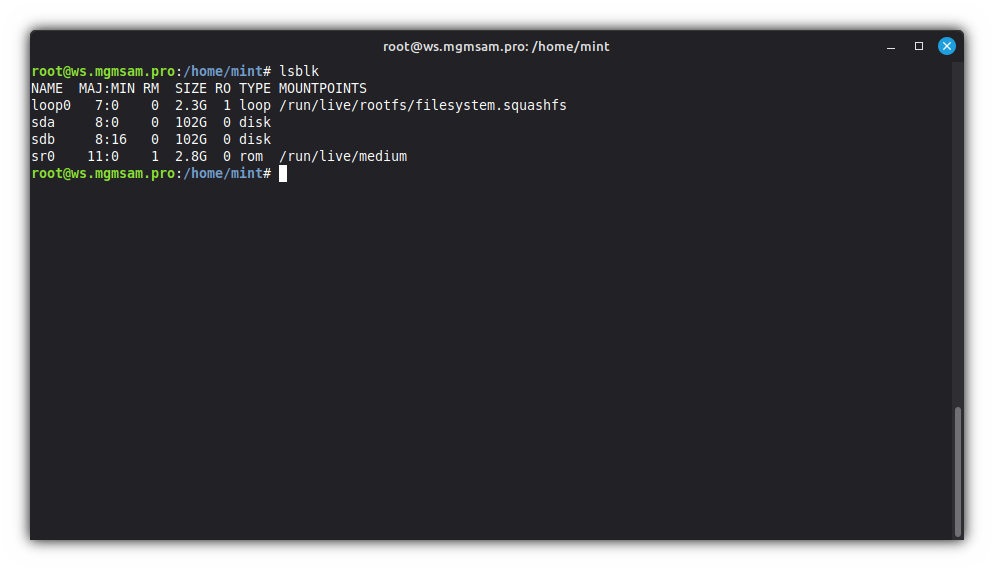
Save the disk names in variables:
export SDA="/dev/sda"
export SDB="/dev/sdb"
Create two partitions on SDA for ESP and mirror array:
Run the
fdiskprogram for the SDA disk:fdisk "$SDA"Create partitions on the disk by following the following list of commands:
     m # print help
     p # print the partition table
     g # create a new empty GPT partition table
     n # add a new partition No.1
     1 # partition number
       # first sector (2048)
   +1G # last sector
     p # print the partition table
     n # add a new partition No.2
     2 # partition number
       # first sector (206848)
       # last sector
     p # print the partition table
     l # list known partition types
     q # quit from list known partition types
     t # change a partition type No.1
     1 # partition number
     1 # EFI System
     t # change a partition type No.2
     2 # partition number
    42 # Linux RAID
     p # print the partition table
     x # extra functionality (experts only)
     m # print help (for GPT)
     n # change partition name No.1
     1 # partition number
  ESP1 # new name No.1
     n # change partition name No.2
     2 # partition number
 RAID1 # new name No.2
     p # print the partition table
     r # return to main menu
     p # print the partition table
     w # write table to disk and exit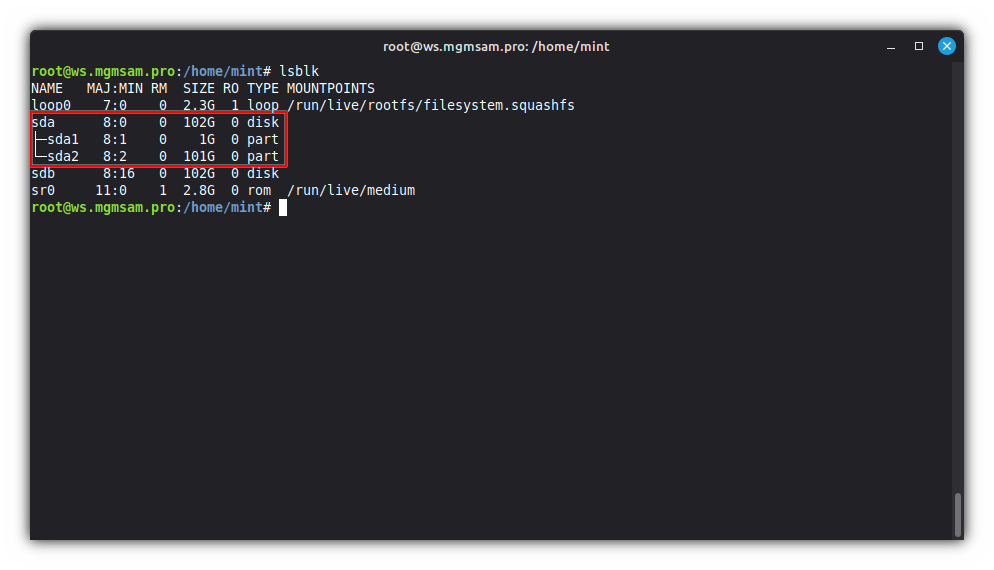
Create two partitions on SDB for ESP and the mirror array:
cat <<FDISK | fdisk "$SDB"
    g # create a new empty GPT partition table
    n # add a new partition No.1
    1

  +1G
    p # print the partition table
    n # add a new partition No.2
    2


    p # print the partition table
    t # change a partition type No.1
    1
    1
    t # change a partition type No.2
    2
   42
    p # print the partition table
    x # extra functionality (experts only)
    n # change partition name No.1
    1
 ESP2
    n # change partition name No.2
    2
RAID1
    p # print the partition table
    r # return to main menu
    p # print the partition table
    w # write table to disk and exit
FDISK
Comments are allowed only when calling commands. Spaces at the beginning and end of commands and values are ignored.

Creating a mirror array with MDADM
MDADM - Multiple Disk and Device Management
Save the name of the RAID array in a variable:
export RAID_DEVICE="/dev/md0"Create an array:
mdadm "$RAID_DEVICE" 1 2 "${SDA}2" "${SDB}2"Check the RAID array status:
cat /proc/mdstat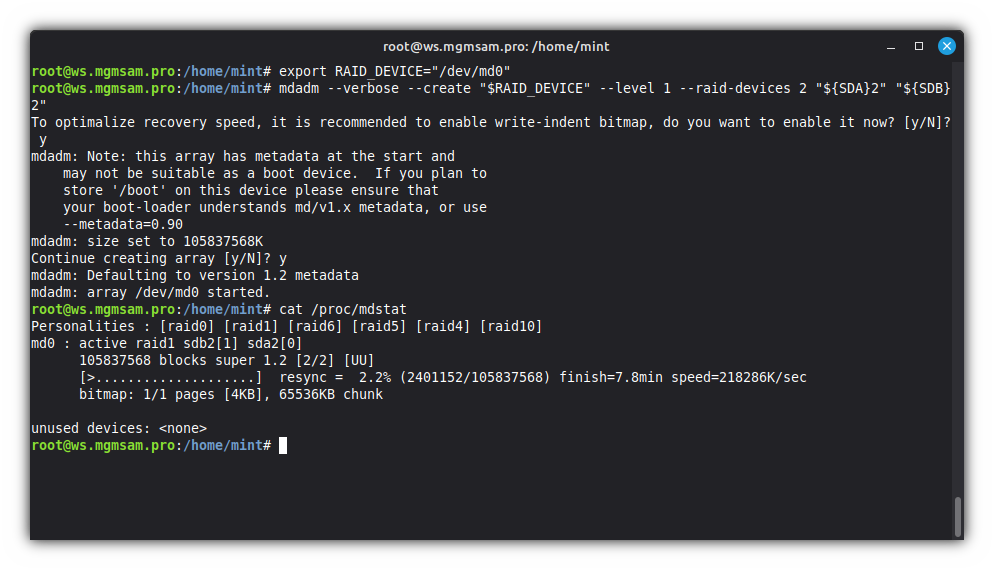
Additional commands
Show help
mdadmDisplay details of an array
mdadm | grep '^ARRAY'Save the array configuration
nano /etc/mdadm/mdadm.confStop the array
mdadm /dev/md0Assemble a previously created array
mdadmHotadd subsequent devices to the array
mdadm /dev/md0 /dev/sdc2Subsequent devices are re-added
mdadm /dev/md0 /dev/sde2Delete super-blocks on the disks from which the array is assembled
mdadm /dev/sda2 /dev/sde2Encryption with LUKS2
LUKS - Linux Unified Key Setup
I need to encrypt a RAID array (
mdadm), but the installer uses filesystem encryption only for LVM:
Save LUKS device in variable:
export LUKS_DEVICE="${RAID_DEVICE:-/dev/md0}"Fill the disk with random data (optional):
Please be patient, this can take hours...
badblocks 10240 random "$LUKS_DEVICE"This terminal command does the same thing as the installer:
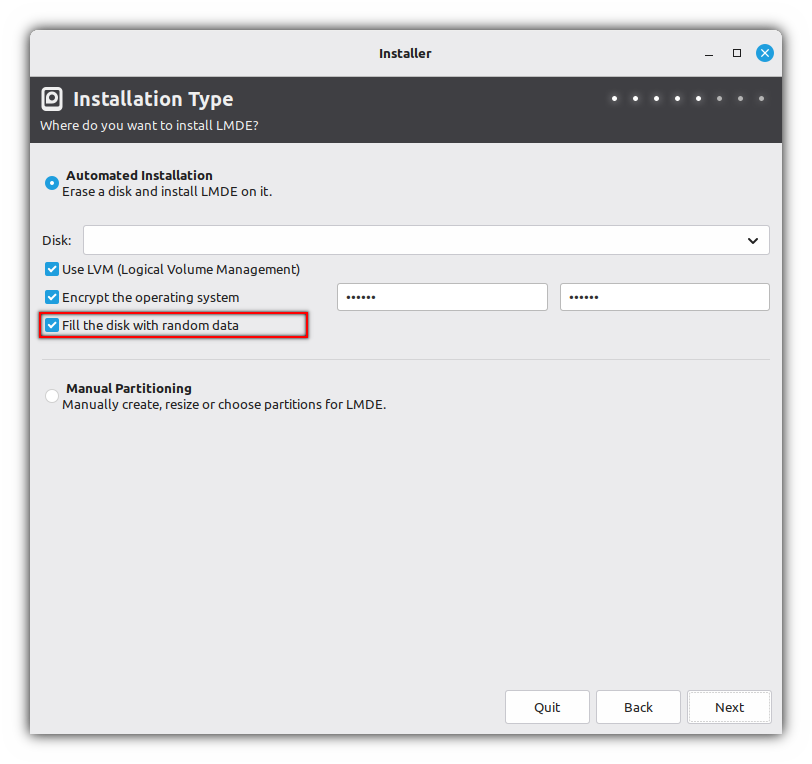
Encrypt the partition:
cryptsetup luksFormat luks2 sha512 512 "$LUKS_DEVICE"Default options for
luks1andluks2:Option LUKS1 LUKS2 --pbkdfpbkdf2 argon2id --key-size256 256 --hashsha256 sha256 --cipheraes-cbc-essiv aes-xts-plain64 --iter-time2000ms 2000ms Where options mean the following:
Option Description --verboseShows more detailed error messages. luksFormatFormats a LUKS device. --pbkdf=STRINGPBKDF algorithm. --key-size=BITSThe size of the encryption key. --hash=STRINGThe hash used to create the encryption key from the passphrase. --cipher=STRINGThe cipher used to encrypt the disk. --iter-time=msecsPBKDF iteration time for LUKS (in ms). Save LUKS name in variable:
export LUKS_NAME="lvmlmde"lvmlmde: Is the default name when using the installer, you can specify something else.Open the LUKS partition:
cryptsetup luksOpen "$LUKS_DEVICE" "$LUKS_NAME"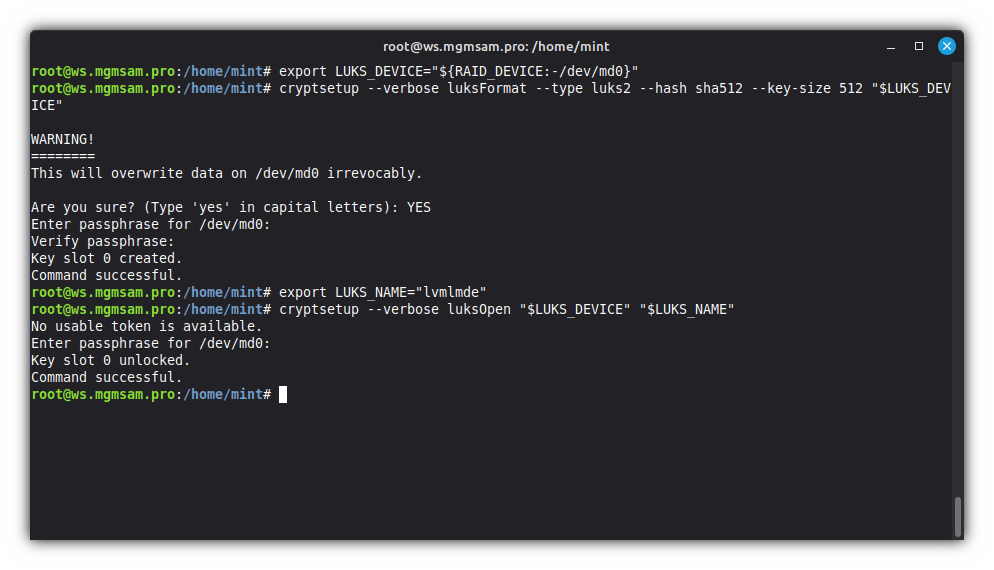
Additional commands
Show help
cryptsetupClose LUKS device (remove mapping)
cryptsetup close /dev/mapper/lvmlmdeShow LUKS device status
cryptsetup status /dev/mapper/lvmlmdeDump LUKS partition information
cryptsetup luksDump /dev/md0Add key to LUKS device
cryptsetup luksAddKey /dev/md0 [<new key file>]Changes supplied key or key file of LUKS device
cryptsetup luksChangeKey /dev/md0 <key slot>Removes supplied key or key file from LUKS device
cryptsetup luksRemoveKey /dev/md0 [<new key file>]Wipes key with number
<key slot>from LUKS devicecryptsetup luksKillSlot /dev/md0 <key slot>Setup LVM
LVM - Logical volume manager
Initializing LVM
Save the device name in variable:
LVM_PHYSICAL_VOLUME="/dev/mapper/lvmlmde"Initialize physical volume:
pvcreate "$LVM_PHYSICAL_VOLUME"Display various attributes of physical volume(s)
pvdisplayor display information about physical volumes
pvs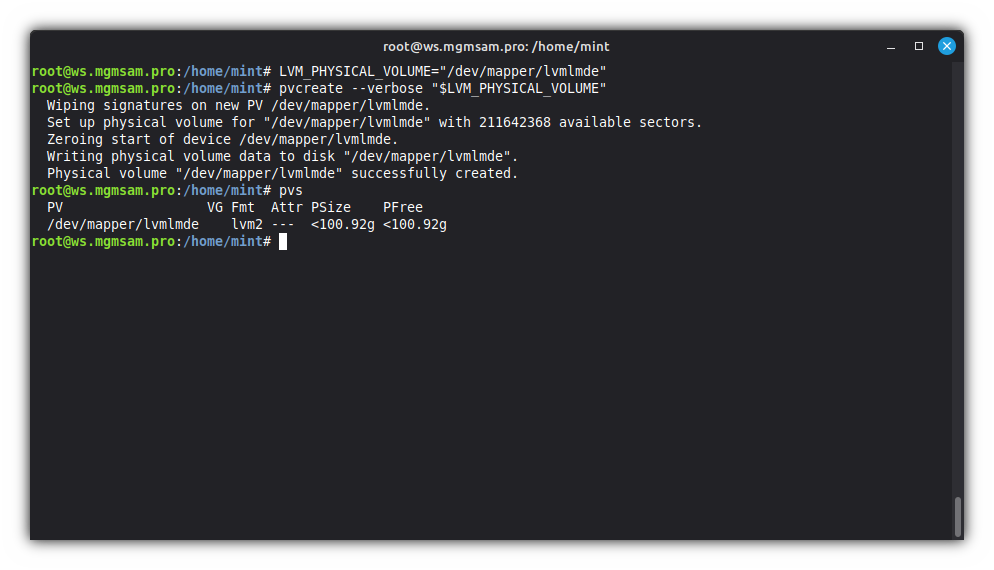
Creating a volume group
Save the volume group name in a variable:
export LVM_VOLUME_GROUP="lvmlmde"lvmlmde: Is the default volume group name when using the installer, you can specify something else.Create a volume group:
vgcreate "$LVM_VOLUME_GROUP" "$LVM_PHYSICAL_VOLUME"Display volume group information
vgdisplayor display information about volume groups
vgs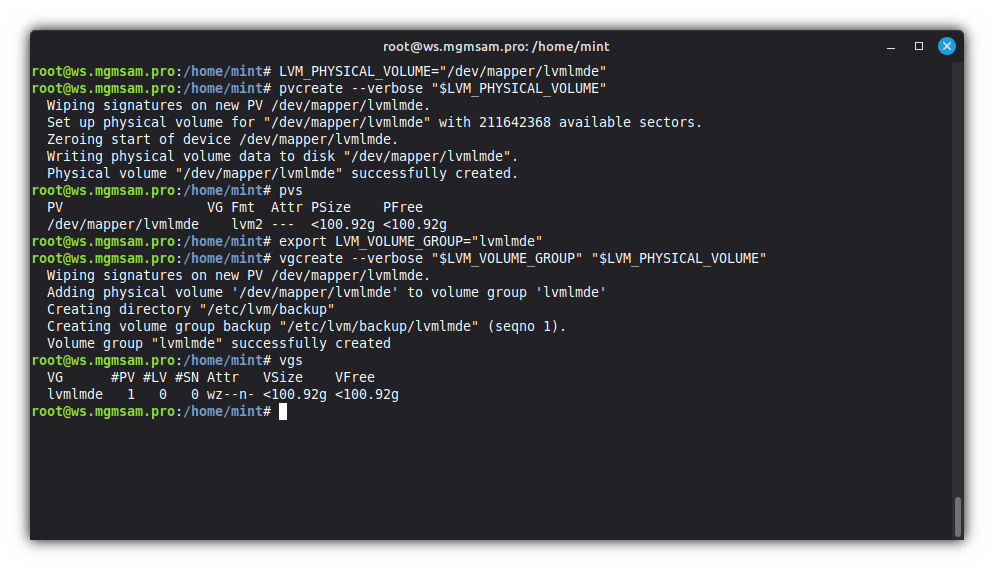
Creating the logical volume
Create the root logical volume:
lvcreate root 50G "$LVM_VOLUME_GROUP"Create the home logical volume:
lvcreate home 50G "$LVM_VOLUME_GROUP"Display information about a logical volume
lvdisplayor display information about logical volumes
lvs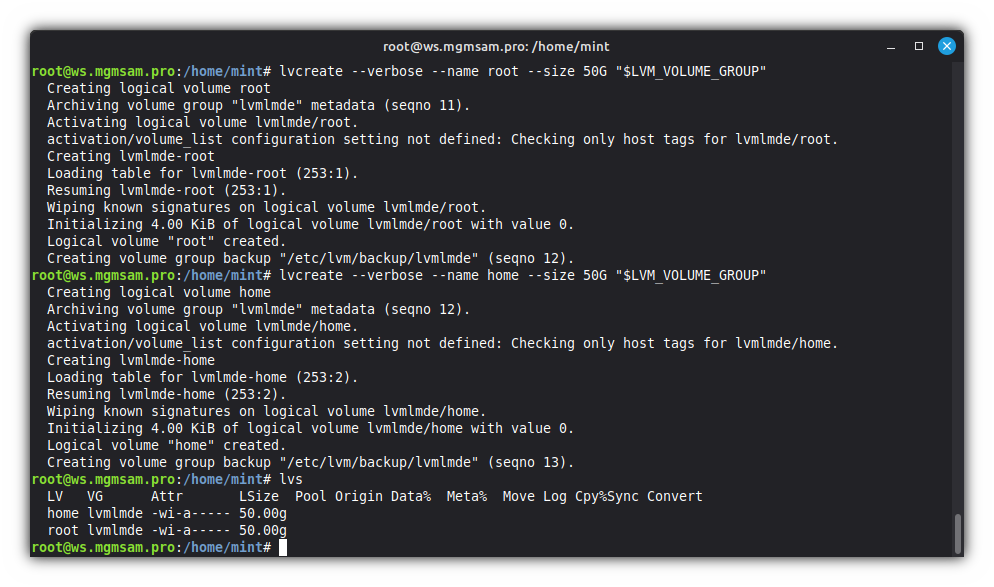
Additional commands
Deactivation/activation LVM
Deactivating Volume Groups:
vgchange n lvmlmdeActivating Volume Groups:
vgchange y lvmlmde
Rename LVM
Rename a logical volume:
lvrename lvmlmde root linuxor
lvrename /dev/lvmlmde/root linuxRename a volume group:
vgrename lvmlmde sys
Remove LVM
Remove logical volume(s):
lvremove /dev/lvmlmde/root lvremove /dev/lvmlmde/homeor remove all logical volumes in the volume group
lvremove lvmlmdeRemove volume group(s):
vgremove lvmlmdeRemove LVM label(s) from physical volume(s):
pvremove /dev/mapper/lvmlmde
Formatting partitions
Format the ESP:
mkfs.fat 32 ESP1 "${SDA}1"mkfs.fat 32 ESP2 "${SDB}1"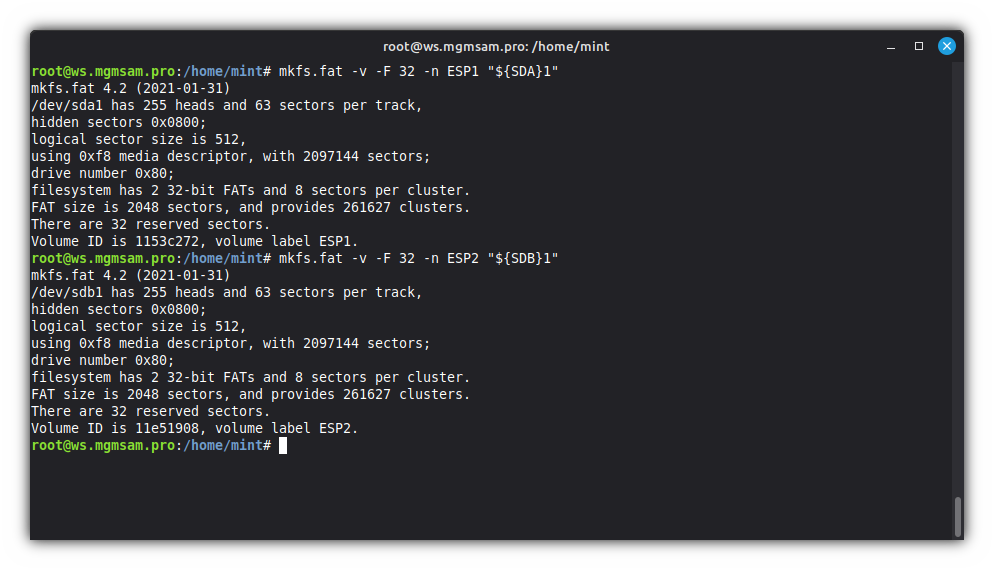
Format the root partition:
mkfs.xfs root "/dev/mapper/$LVM_VOLUME_GROUP-root"
Format the home partition:
mkfs.xfs home "/dev/mapper/$LVM_VOLUME_GROUP-home"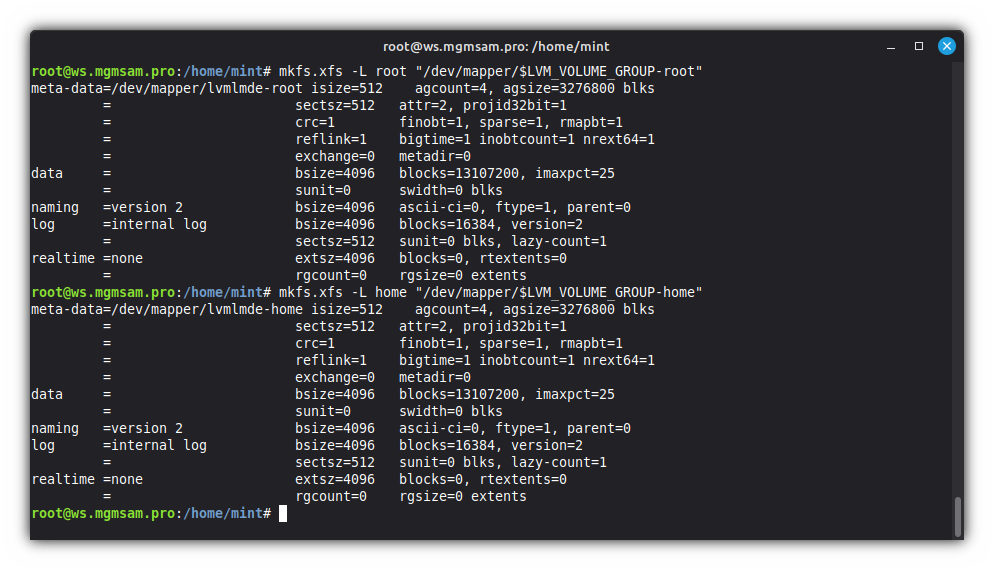
Additional commands
Remove a file system
dd if=/dev/zero of=/dev/sda1 bs=2048 count=1 conv=notrunc
Installing the system
Mounting ISO image
Create a directory for mounting ISO image:
mkdir /sourceMount the ISO image:
mount loop squashfs /run/live/medium/live/filesystem.squashfs /source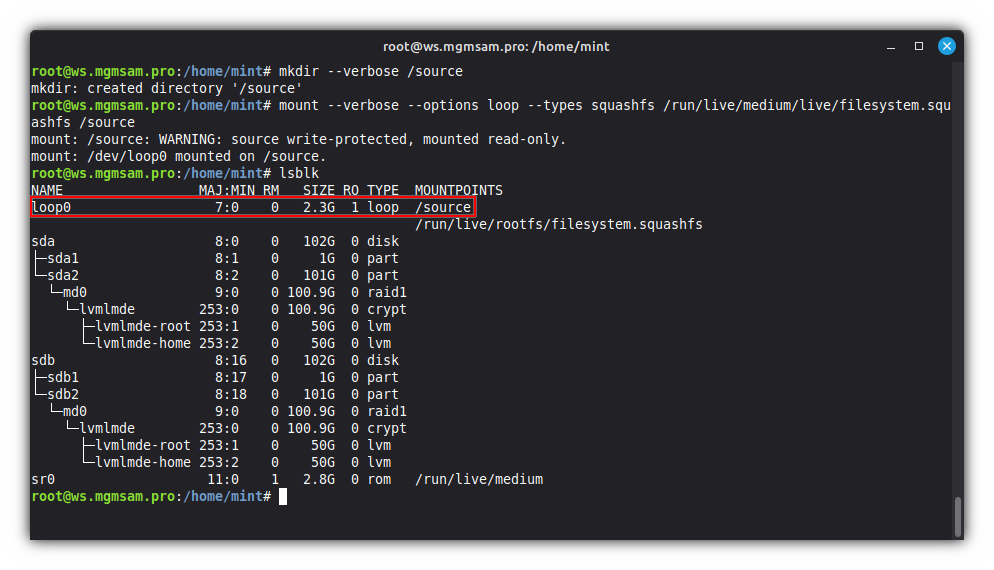
Mounting
/targetCreate the root mount directory:
mkdir /targetMount the root partition:
mount "/dev/mapper/$LVM_VOLUME_GROUP-root" /target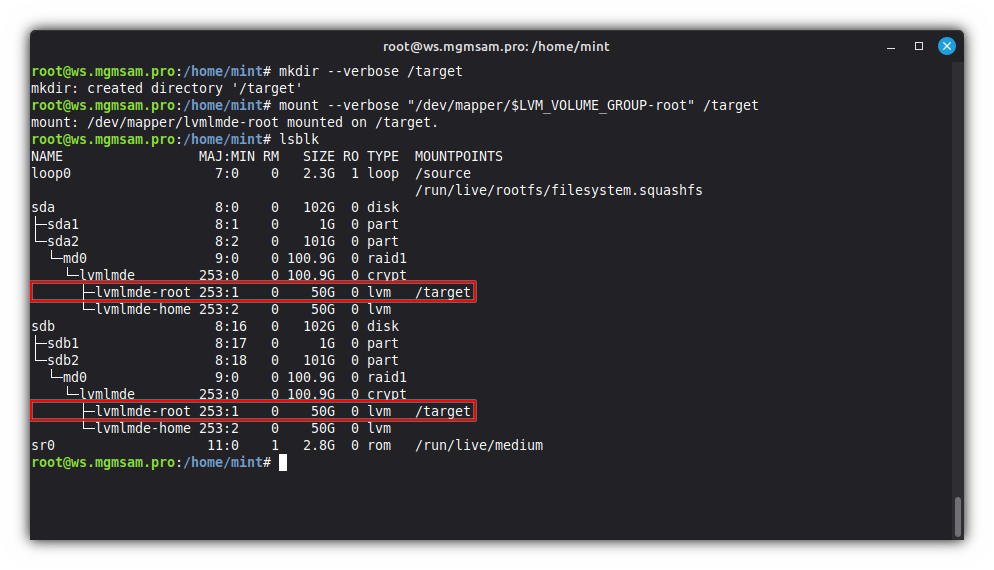
Create a directory to mount the home partition:
mkdir /target/homeMount the home partition:
mount "/dev/mapper/$LVM_VOLUME_GROUP-home" /target/home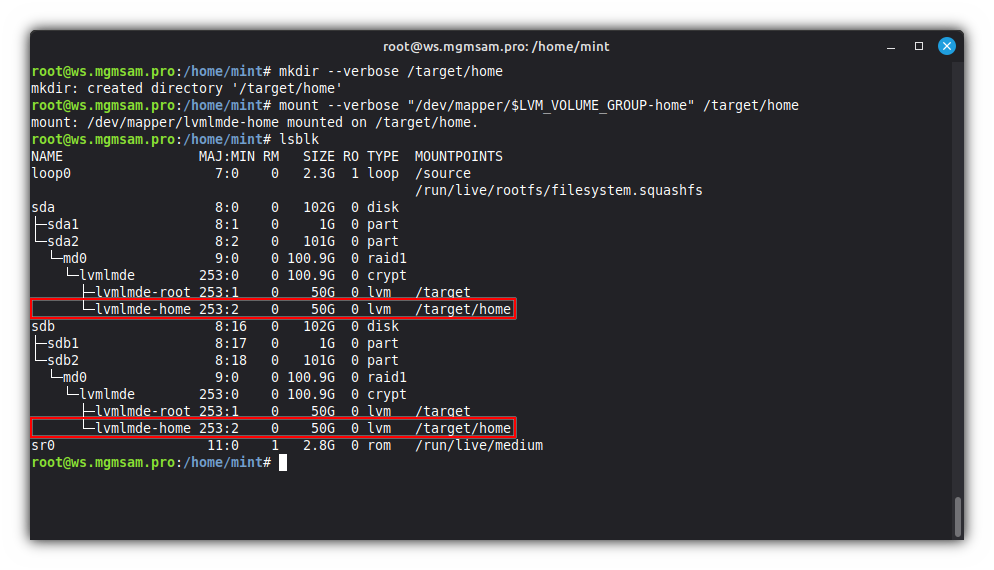
Create a directory to mount the ESP:
mkdir /target/boot/efiMount the ESP:
mount umask=0077 "${SDA}1" /target/boot/efi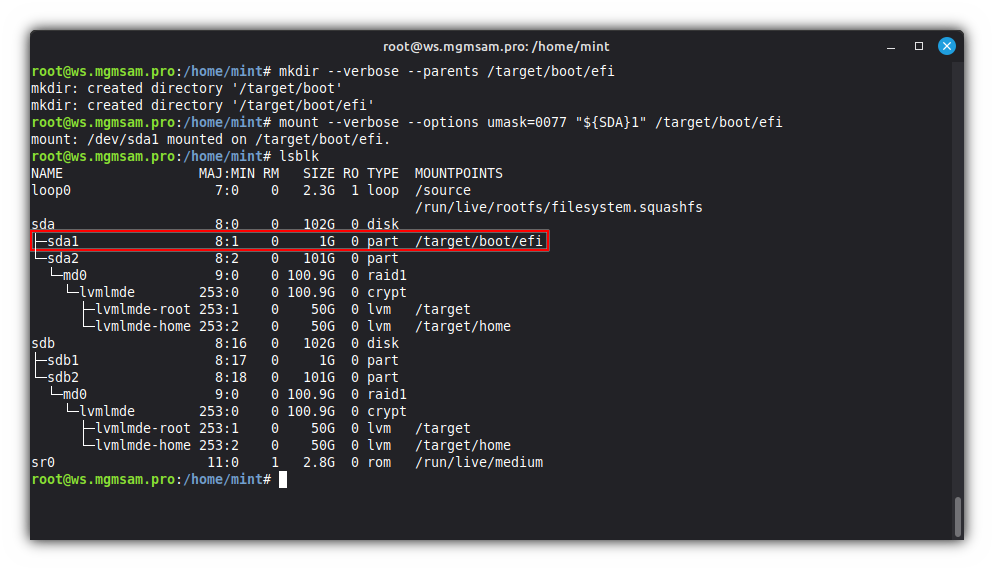
Transferring the files
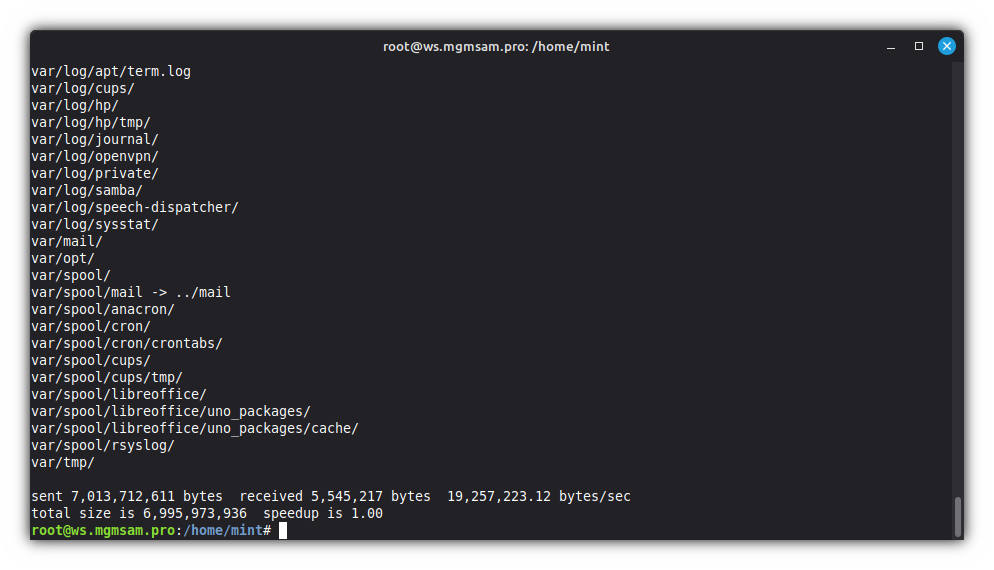
Copy the operating system files from the ISO image to the root partition:
EXCLUDE_DIRS="home/* dev/* proc/* sys/* tmp/* run/* mnt/* media/* lost+found source target"set RSYNC_FILTER= for d in $EXCLUDE_DIRS do RSYNC_FILTER="${RSYNC_FILTER:-} =/$d" done setRSYNC_FILTER="--exclude=/home/* --exclude=/dev/* --exclude=/proc/* ..."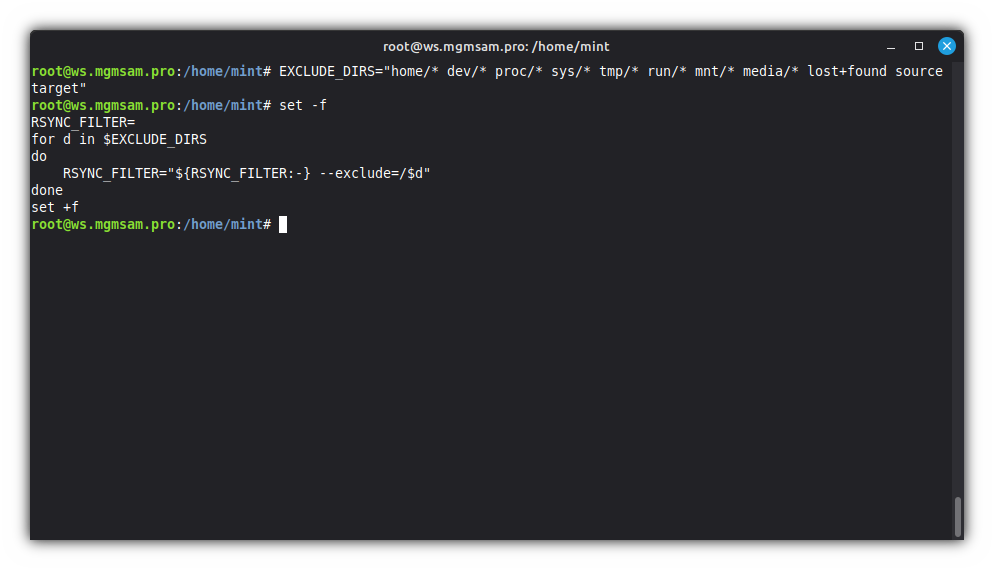
rsync $RSYNC_FILTER /source/* /target/Description of
rsyncoptions:Option Description --verboseIncrease verbosity. --archiveArchive mode is -rlptgoD(no-A,-X,-U,-N,-H).--recursive,-rRecurse into directories. --links,-lCopy symlinks as symlinks. --perms,-pPreserve permissions. --times,-tPreserve modification times. --group,-gPreserve group. --owner,-oPreserve owner (super-user only). -DSame as --devices--specials.--devicesPreserve device files (super-user only). --specialsPreserve special files. --no-*Turn off an implied OPTION. --aclsPreserve ACLs (implies --perms). --hard-linksPreserve hard links. --xattrsPreserve extended attributes. --excludeExclude files matching PATTERN. 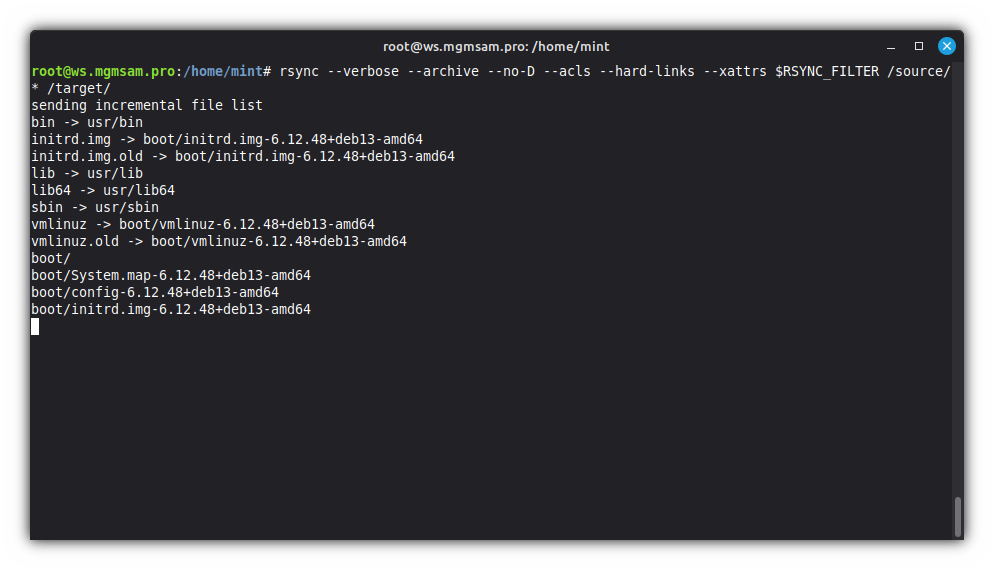
Additional commands
To set the current date on the operating system files:
rsync \ $RSYNC_FILTER \ /source/* \ /target/rsync \ /source/var/lib/apt/lists/*Release \ /target/var/lib/apt/lists/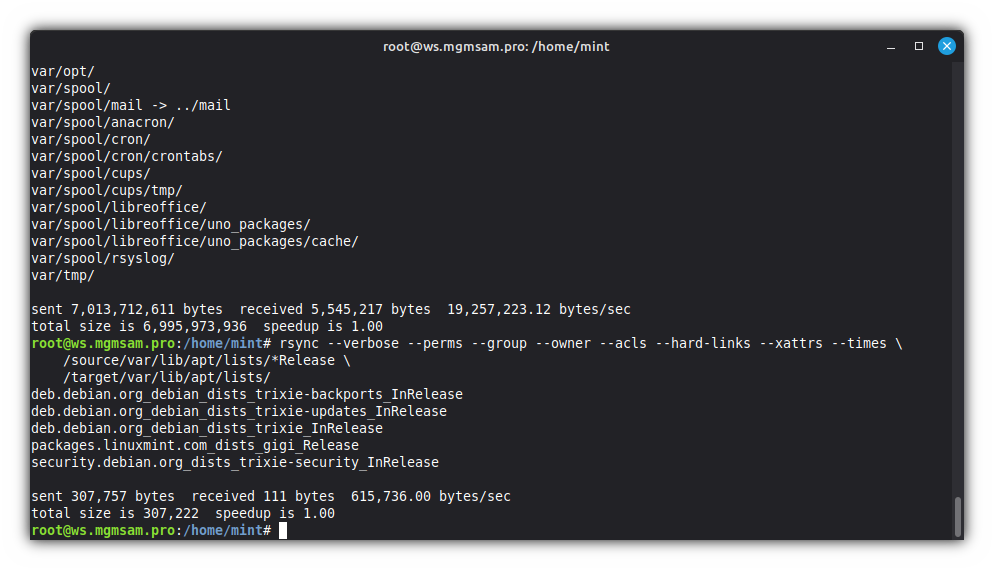
Copy the local domain name system configuration file:
mv /target/etc/resolv.conf /target/etc/resolv.conf.bk cp /etc/resolv.conf /target/etc/resolv.confUnmount ISO image:
umount /source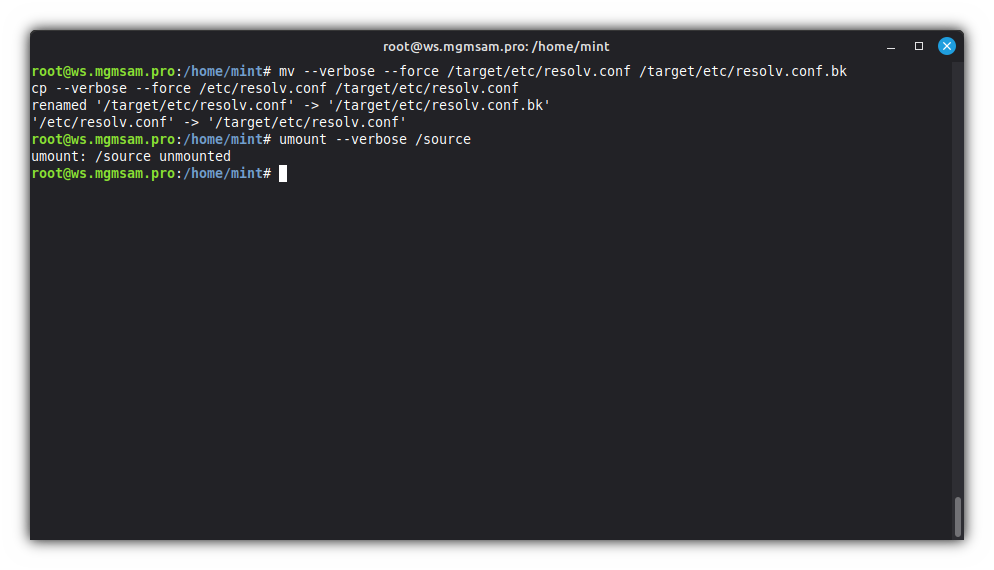
Configuring the system
Entering the system
Mount essential system directories:
mkdir /target/sys/firmware/efi/efivarsfor FS in /dev /dev/shm /dev/pts /proc /run /sys /sys/firmware/efi/efivars do mount "$FS" "/target$FS" doneDescription of mounted directories:
Directory Description /devDevices and special files. /dev/shmOverview of POSIX shared memory. /dev/ptsPseudoterminal master and slave. /procKernel and process information virtual filesystem. /runRun-time variable data. /sysKernel and system information virtual filesystem. /sys/firmware/efi/efivarsefivarfs - a (U)EFI variable filesystem. Chroot:
chroot /target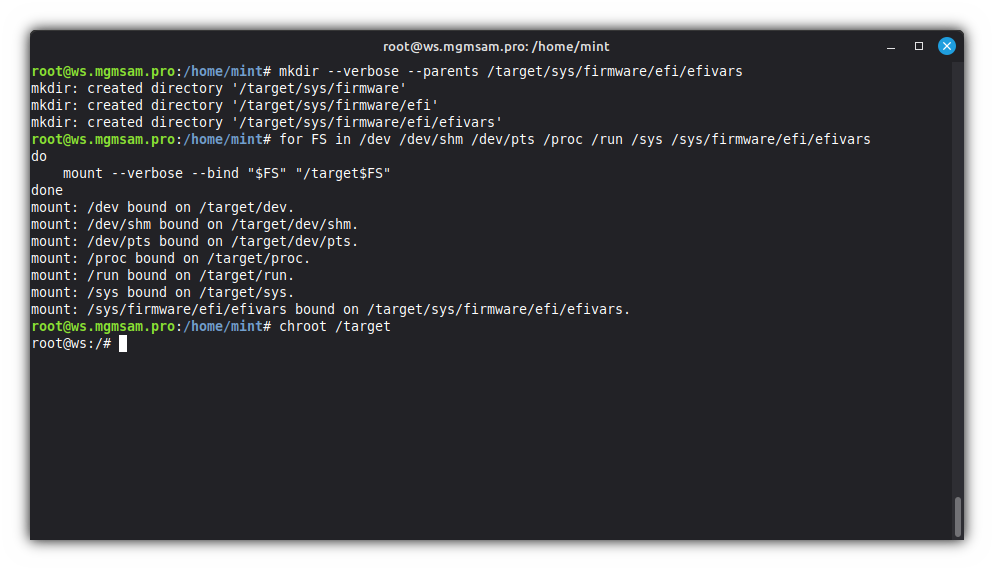
Additional commands
To display the new fqdn (fully qualified domain name) in the terminal:
Editing the
PS1variable:sed ' /[[:blank:]]*PS1=/ { s%\\h%\\u@\\H% s%^\([[:blank:]]*\)#[#[:blank:]]*\([^[:blank:]#]\)%\1\2% } ' /root/.bashrcExec to the chroot user again:
exitchroot /target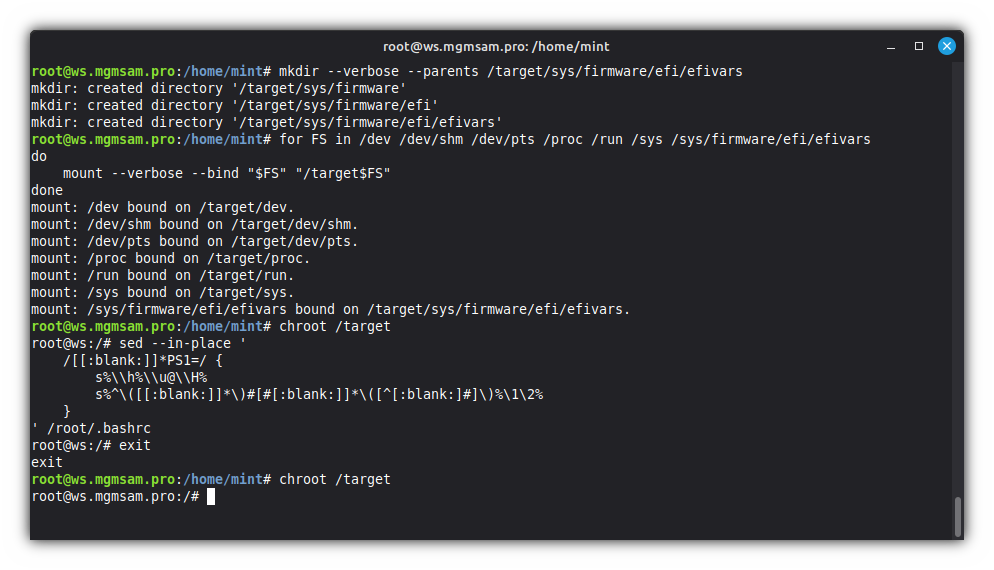
Removing packages
Remove LIVE packages and their system-wide configuration files:
apt purge live-config* live-installer* live-boot* live-tools*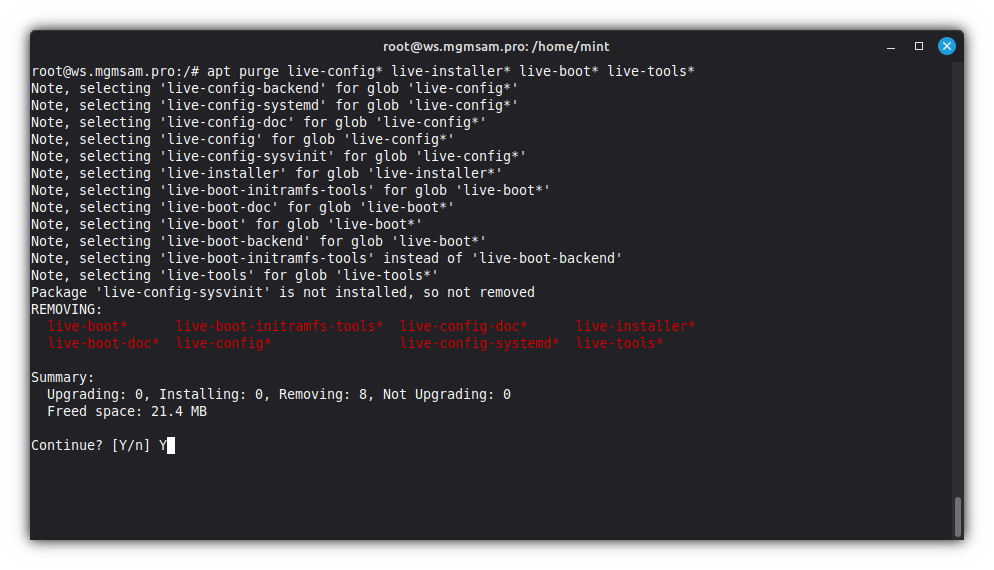
Remove LIVE leftovers:
rm \ /etc/live \ /lib/live \ /etc/casper* \ /lib/casper \ /usr/lib/casper \ /usr/share/casper \ /usr/share/applications/debian-installer-launcher.desktopRemove all packages related to the
grubboot loader:apt purge grub-*Remove
grubleftovers:rm /boot/grub /etc/default/grub.d /etc/grub.d
Setting the timezone

dpkg-reconfigure tzdataSetting the locale

Reconfigure the system's locale settings:
dpkg-reconfigure localesAdd system locale variables:
cat <<LOCALE > /etc/default/locale
#  File generated by update-locale
LC_CTYPE="en_US.UTF-8"
LC_ALL="en_US.UTF-8"
LANG="en_US.UTF-8"
LANGUAGE="en_US:en"
LOCALE
Configuring keyboard
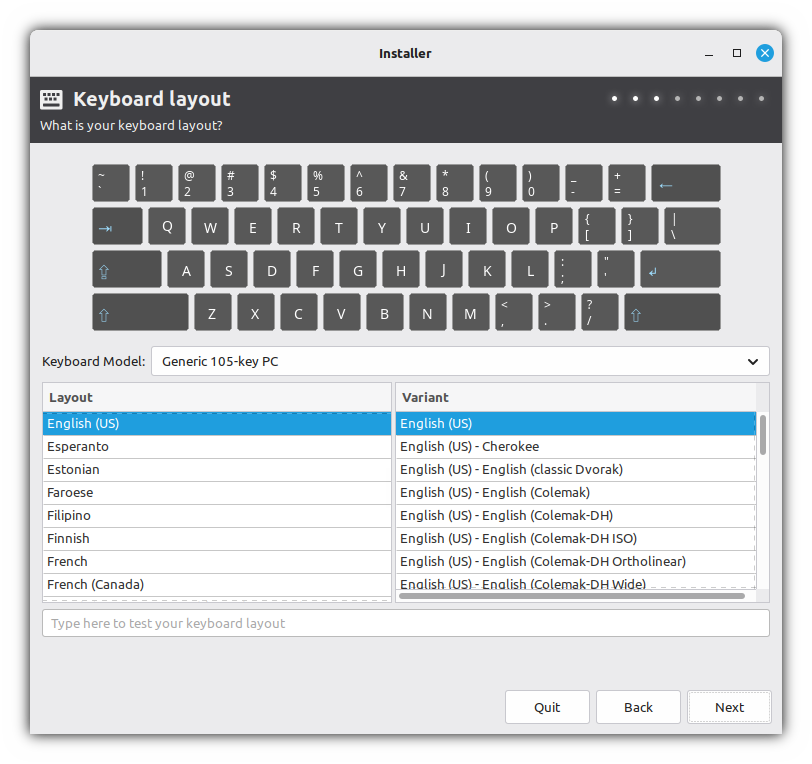
dpkg-reconfigure keyboard-configurationSetting up users
Lock and delete root password:
passwd rootSet a password for logging in to the system as root
WARNING: For experts only !
passwd rootAdd a new user:
Set variables for use in subsequent commands:
USER_NAME="sam"
REAL_NAME="Semyon A Mironov"
USER_GROUPS="adm,audio,bluetooth,cdrom,dialout,dip,fax,floppy,lpadmin,netdev,plugdev,scanner,sudo,tape,users,video"
The group list is obtained from the operating system installed by the installer:
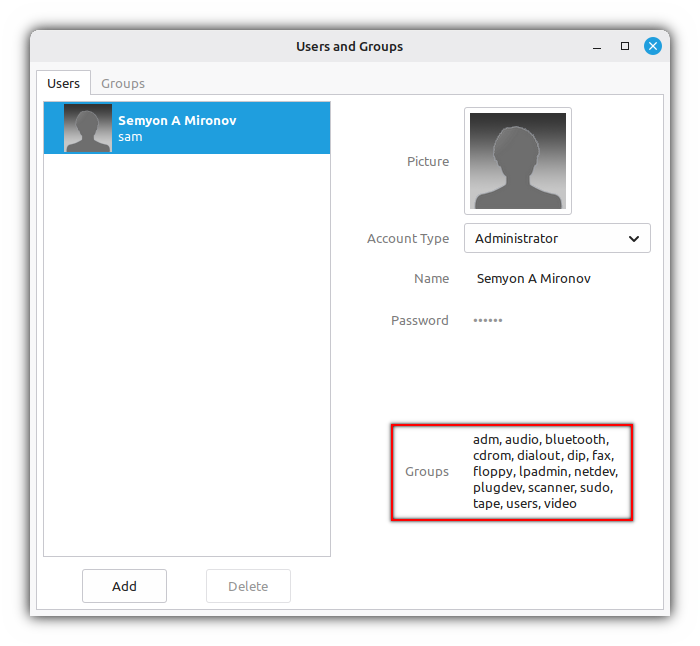
Create a user:
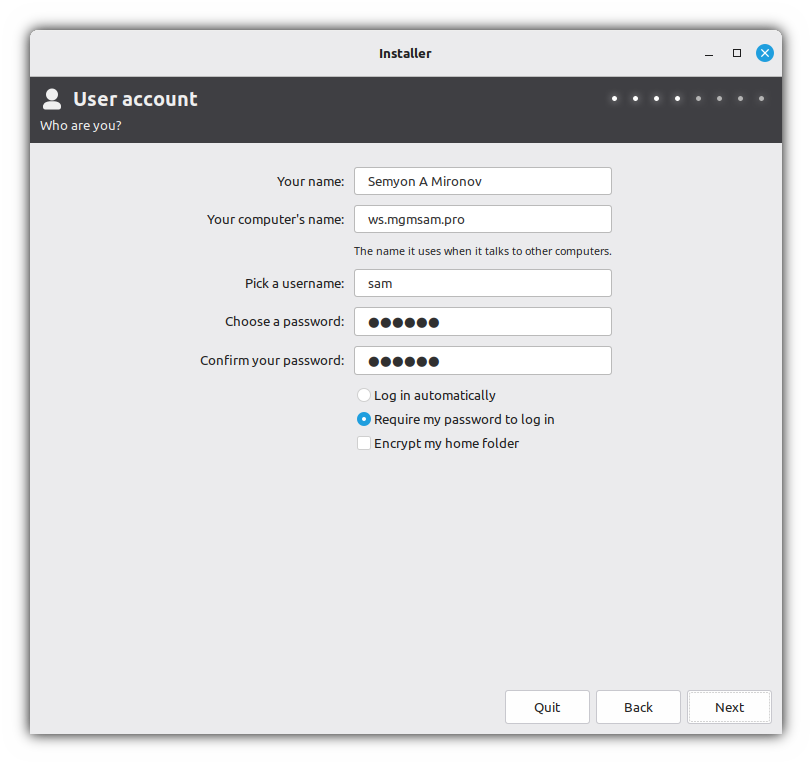
Choose to Create a user with home directory encryption or Create a user without encryption
Create a user with home directory encryption:
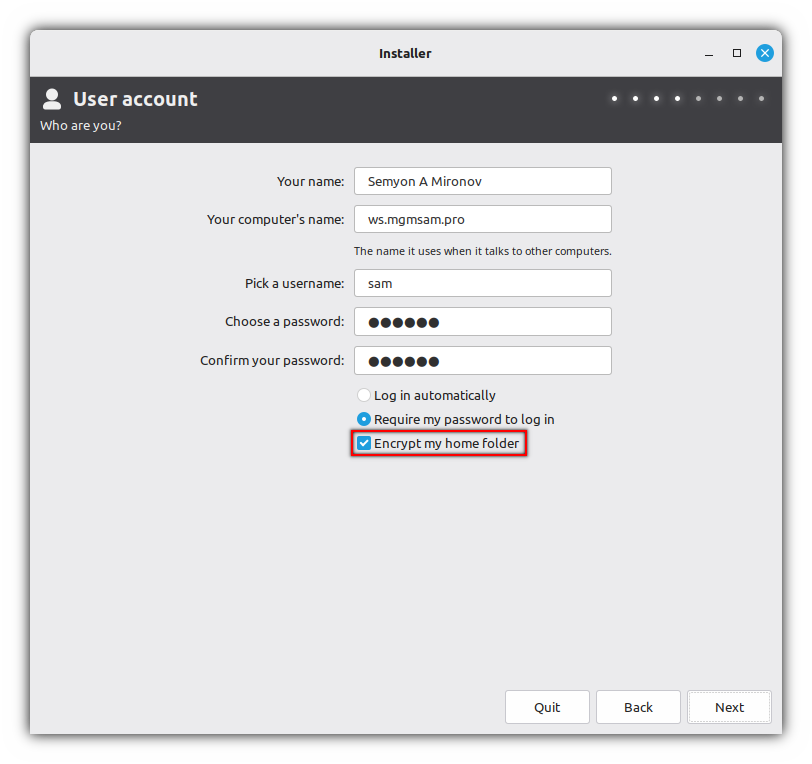
Create a user:
adduser info /bin/bash \ ${REAL_NAME:+--comment "$REAL_NAME"} \ "$USER_NAME"Add a user to groups:
usermod "$USER_GROUPS" "$USER_NAME"Enable termination of user processes after logout:
sed 's%^#\+\(KillUserProcesses\)=.*$%\1=yes%' /etc/systemd/logind.conf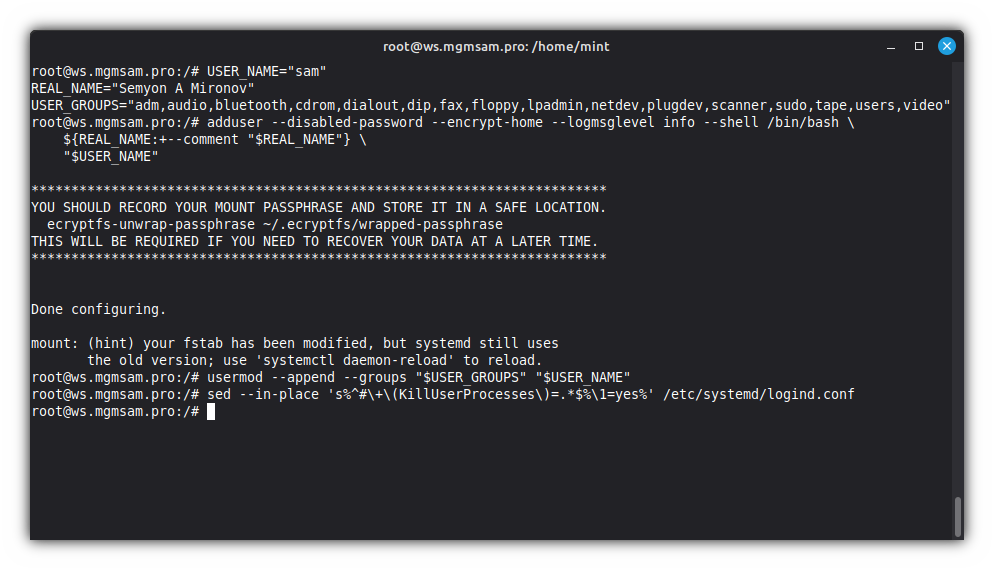
Additional commands
If you need to delete a user:
perl /usr/sbin/deluser "$USER_NAME"
Create a user without encryption:
useradd "$USER_GROUPS" /bin/bash \ ${REAL_NAME:+--comment "$REAL_NAME"} \ "$USER_NAME"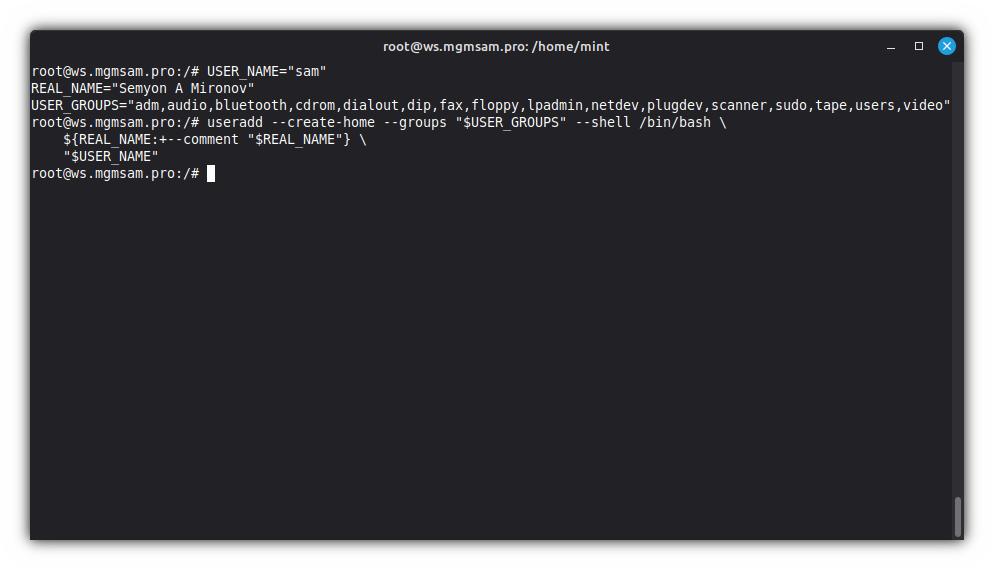
Additional commands
If you need to delete a user:
deluser "$USER_NAME"
Set user password:
passwd "$USER_NAME"Set LightDM to show user list by default:
If this step is not performed, the user list will be hidden:
sed ' s%^#\?\(greeter-hide-users\)[[:blank:]]*=.*%\1=false% ' /etc/lightdm/lightdm.confSet autologin (optional):
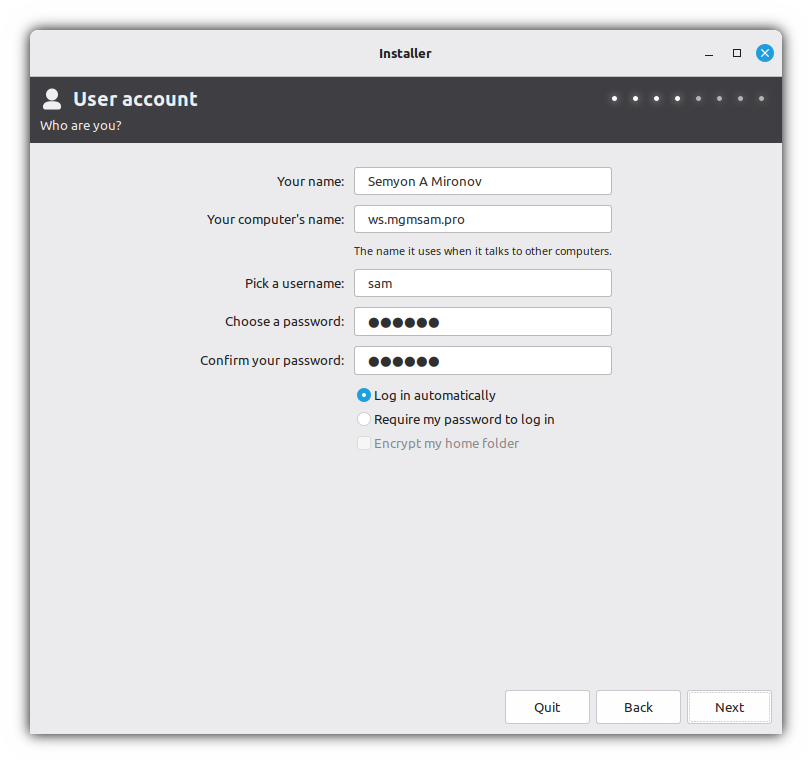
This parameter is ignored for the root user and for users with an encrypted home directory.
sed " s%^#\?\(autologin-user\)[[:blank:]]*=.*%\1=$USER_NAME% " /etc/lightdm/lightdm.confEnable manual username entry in the login window:
This step must be completed if you set a password for the root user and wish to be able to log in to the system using that account.
sed ' s%^#\?\(greeter-show-manual-login\)[[:blank:]]*=.*%\1=true% ' /etc/lightdm/lightdm.conf
Writing hostname
Edit the
/etc/hostnamefile:echo "$HOST_NAME" > /etc/hostnameCheck the
/etc/hostnamefile:cat /etc/hostnameEditing the
/etc/hostsfile:Save a text file that contains a database of domain names and is used when translating them to network host addresses.
cat <<HOSTS > /etc/hosts
127.0.0.1   localhost
127.0.1.1   $HOST_NAME
# The following lines are desirable for IPv6 capable hosts
::1     localhost ip6-localhost ip6-loopback
fe00::0 ip6-localnet
ff00::0 ip6-mcastprefix
ff02::1 ip6-allnodes
ff02::2 ip6-allrouters
ff02::3 ip6-allhosts
HOSTS
Check the
/etc/hostsfile:cat /etc/hosts
Configuring MDADM
Generate a new
/etc/mdadm/mdadm.conffile:bash /usr/share/mdadm/mkconf force-generateSave the RAID configuration:
RAID_ARRAY="$(mdadm | grep '^ARRAY')"Check the
RAID_ARRAYvariable:echo "$RAID_ARRAY"Update the RAID configuration:
sed "s|^ARRAY.*$|$RAID_ARRAY|" /etc/mdadm/mdadm.conf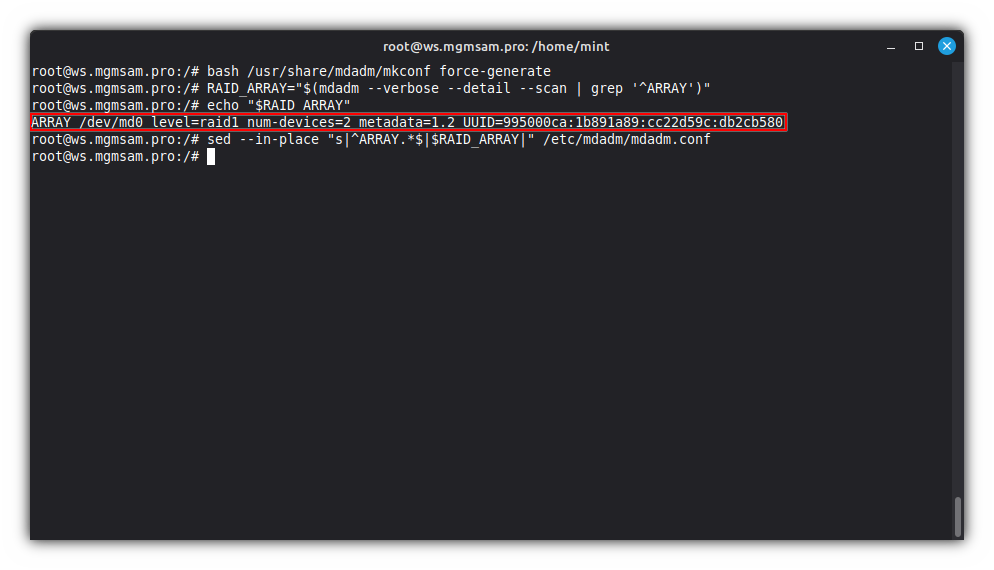
Check the
/etc/mdadm/mdadm.conffile:cat /etc/mdadm/mdadm.conf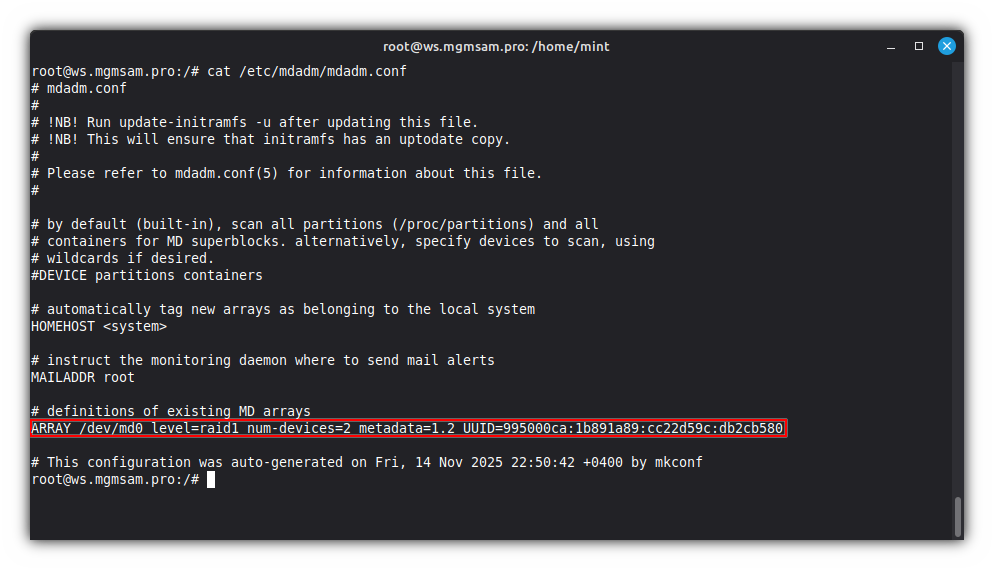
Configuring LUKS
Follow the steps in this section if you followed the steps described in the Encryption with LUKS2 section.
Choose to Configuring LUKS with password unlock or Configuring LUKS with password and USB unlock
Configuring LUKS with password unlock
Get UUID of LUKS device:
LUKS_UUID="$(cryptsetup luksUUID "$LUKS_DEVICE")"Check LUKS UUID variable:
echo "LUKS_UUID: $LUKS_UUID"Save configuration for encrypted block devices:
cat <<CRYPTTAB > /etc/crypttab
# <target name> <source device>                           <key file> <options>
$LUKS_NAME         UUID=$LUKS_UUID none       luks,discard,tries=3
CRYPTTAB
Check
/etc/crypttabfile:cat /etc/crypttab
Configuring LUKS with password and USB unlock
Insert the USB drive into the host and define it in the
lsblkoutput: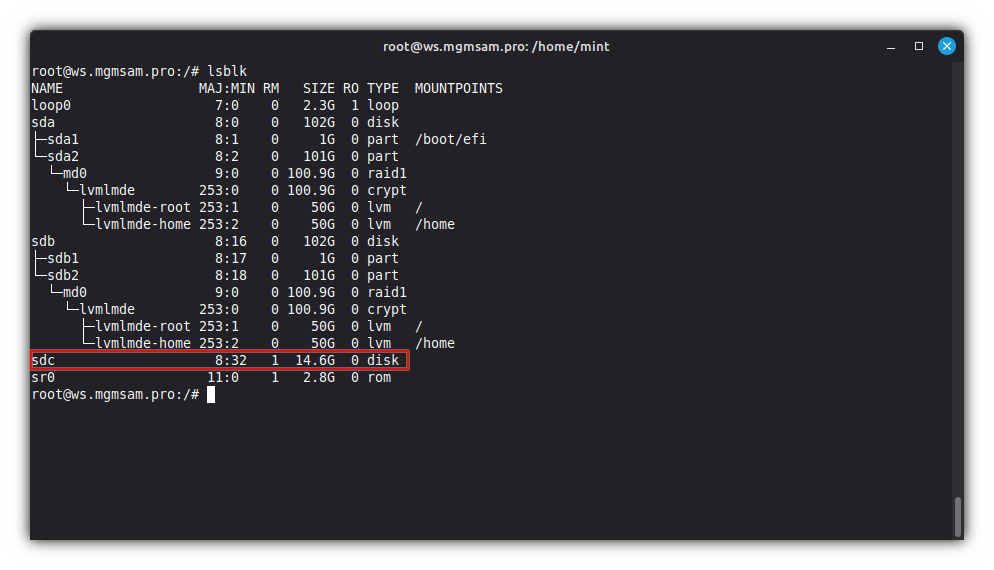
Set variables for use in subsequent commands:
USB="/dev/sdc"           # The USB drive from the `lsblk` output
USB_MOUNT="/mnt"         # Specify an existing empty directory for connecting the USB drive
USB_KEY="$HOST_NAME.lek" # The name of the key file to create on the USB drive. (*.lek - LUKS Encryption Key)
Check USB variables:
echo "      USB: $USB"
echo "USB_MOUNT: $USB_MOUNT"
echo "  USB_KEY: $USB_KEY"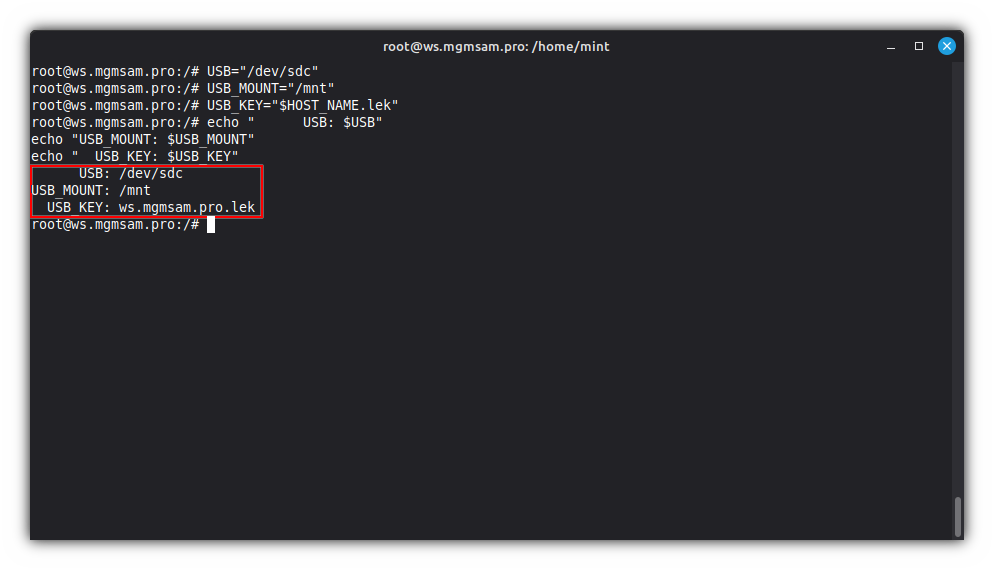
Create partitions on USB drive:
cat <<FDISK | fdisk "$USB"
     g # create a new empty GPT partition table
     n # add a new partition No.1
     1

 +100M
     p # print the partition table
     n # add a new partition No.2
     2


     p # print the partition table
     t # change a partition type No.1
     1
     1
     p # print the partition table
     x # extra functionality (experts only)
     n # change partition name No.1
     1
EFIUSB
     p # print the partition table
     n # change partition name No.2
     2
   USB
     p # print the partition table
     r # return to main menu
     p # print the partition table
     w # write table to disk and exit
FDISK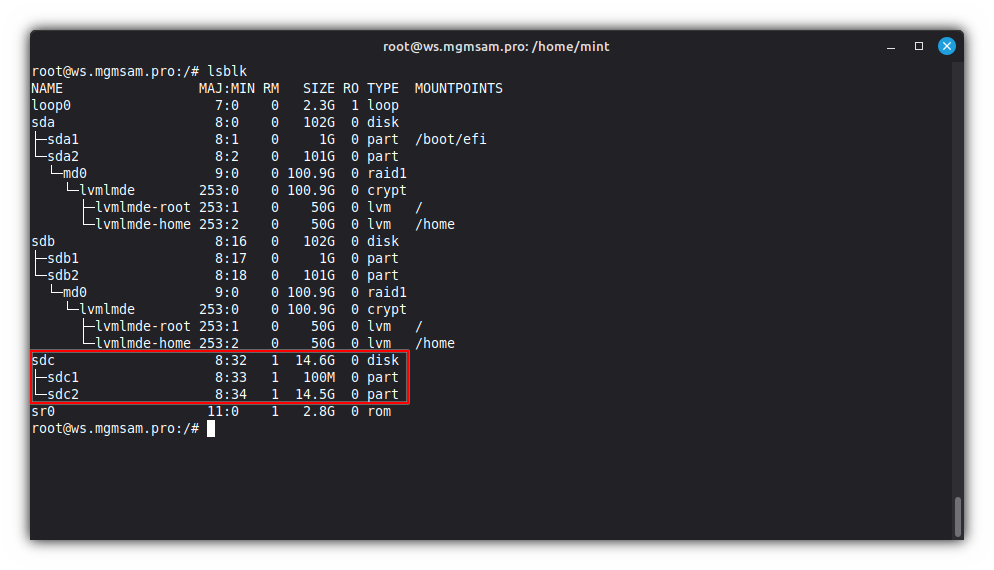
Format the
EFIUSBpartition:mkfs.fat 32 EFIUSB "${USB}1"Format the
USBpartition:mkfs.exfat USB "${USB}2"Mount the
EFIUSBpartition:mount "${USB}1" "$USB_MOUNT"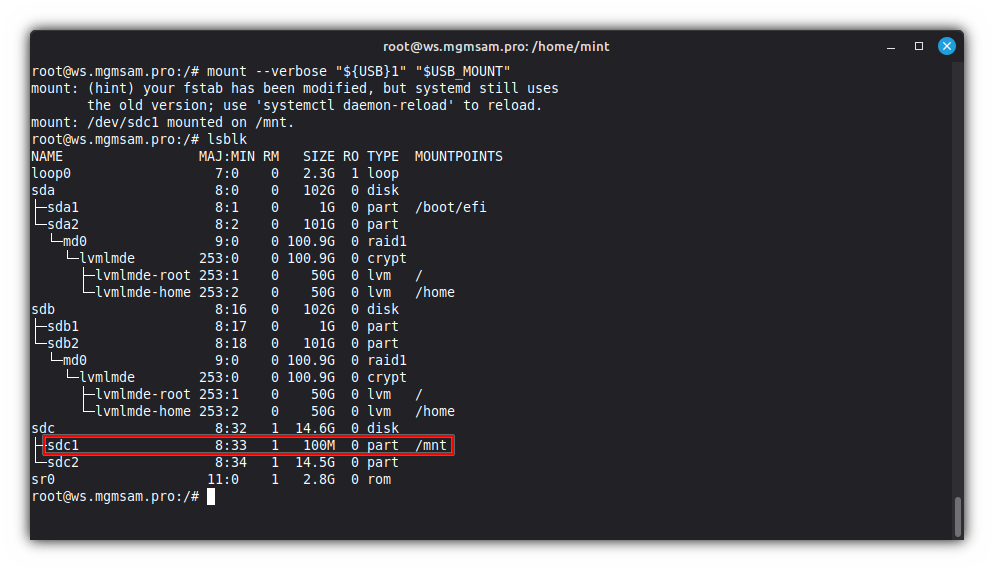
Create a 512-byte key file with random data:
dd if=/dev/urandom of="$USB_MOUNT/$USB_KEY" bs=1 count=512 status=progressThe contents of the key file can be anything, for example, a photo
Add key to LUKS device:
cryptsetup luksAddKey "$LUKS_DEVICE" "$USB_MOUNT/$USB_KEY"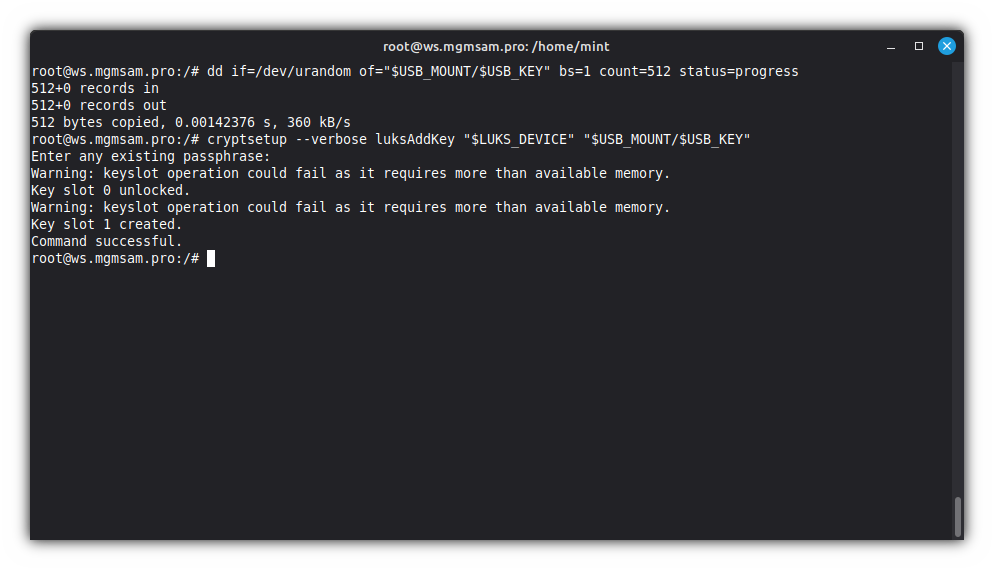
Save script:
wget "/usr/lib/cryptsetup/scripts" \ https://raw.githubusercontent.com/mgmsam/decrypt_keyfile/refs/heads/main/decrypt_keyfileMake the script executable:
chmod u+rwx,go+rx "/usr/lib/cryptsetup/scripts/decrypt_keyfile"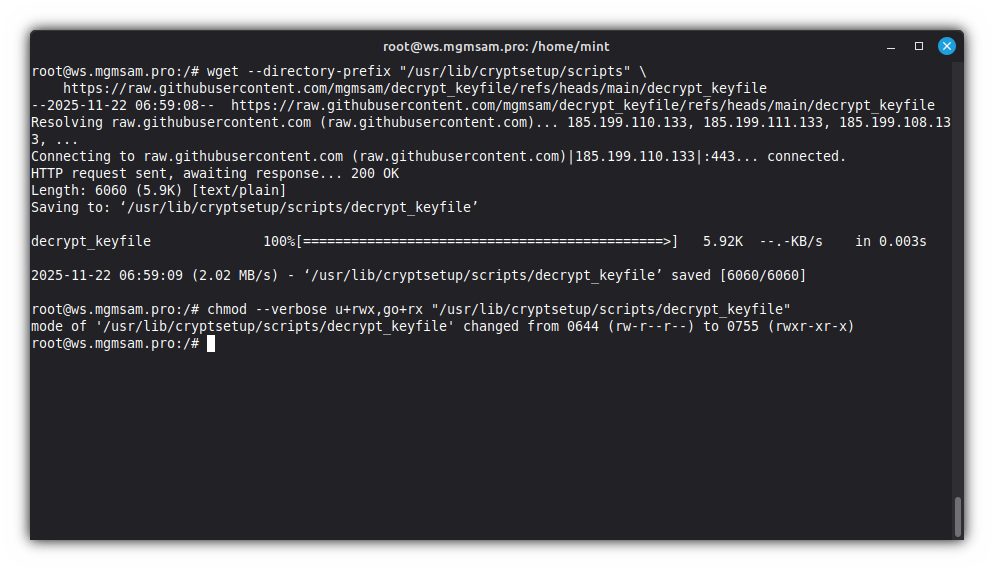
Check script:
cat "/usr/lib/cryptsetup/scripts/decrypt_keyfile"Get UUID of LUKS device:
LUKS_UUID="$(cryptsetup luksUUID "$LUKS_DEVICE")"Get UUID of USB device:
USB_UUID="$(blkid UUID value "${USB}1")"Check UUIDs variables:
echo "LUKS_UUID: $LUKS_UUID"
echo " USB_UUID: $USB_UUID"
Save configuration for encrypted block devices:
cat <<CRYPTTAB > /etc/crypttab
# <target name> <source device>                           <key file>                           <options>
$LUKS_NAME         UUID=$LUKS_UUID UUID=$USB_UUID:/$USB_KEY:10 luks,discard,tries=3,keyscript=decrypt_keyfile
CRYPTTAB
Check the
/etc/crypttabfile:cat /etc/crypttab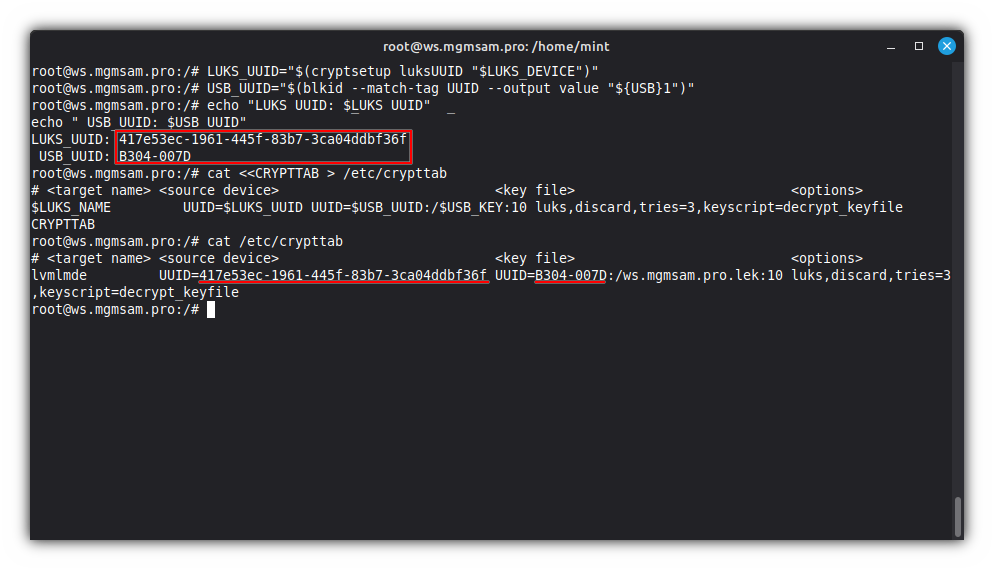
Unmount the
EFIUSBpartition:umount "${USB}1"
Creating swap
Set the swap file path and size:
SWAP_FILE="/swapfile"
# Specify the swap file size in mebibytes: 16384 - 16Gb
SWAP_SIZE="16384M"
# or use a swap file equal to the amount of RAM
#SWAP_SIZE="$(cat /proc/meminfo | awk '/MemTotal/ {print $2}')K"
Create the swap file:
fallocate "$SWAP_SIZE" "$SWAP_FILE"Set the file permissions:
chmod 600 "$SWAP_FILE"Initialize the file as a swap file:
mkswap "$SWAP_FILE"Configure kernel parameters for swap:
cat <<SWAP.CONF > /etc/sysctl.d/swap.conf
vm.swappiness=60
vm.vfs_cache_pressure=100
SWAP.CONF
The specified options have default values
Where options mean the following:
Option Description vm.swappinessvm.vfs_cache_pressurehttps://docs.kernel.org/admin-guide/sysctl/vm.html. 
Writing fstab
Get UUID of the system partitions:
ESP1_UUID="$(blkid UUID value "${SDA}1")" ROOT_UUID="$(blkid UUID value "/dev/mapper/$LVM_VOLUME_GROUP-root")" HOME_UUID="$(blkid UUID value "/dev/mapper/$LVM_VOLUME_GROUP-home")"Check UUIDs variables:
echo "ESP1_UUID: $ESP1_UUID"
echo "ROOT_UUID: $ROOT_UUID"
echo "HOME_UUID: $HOME_UUID"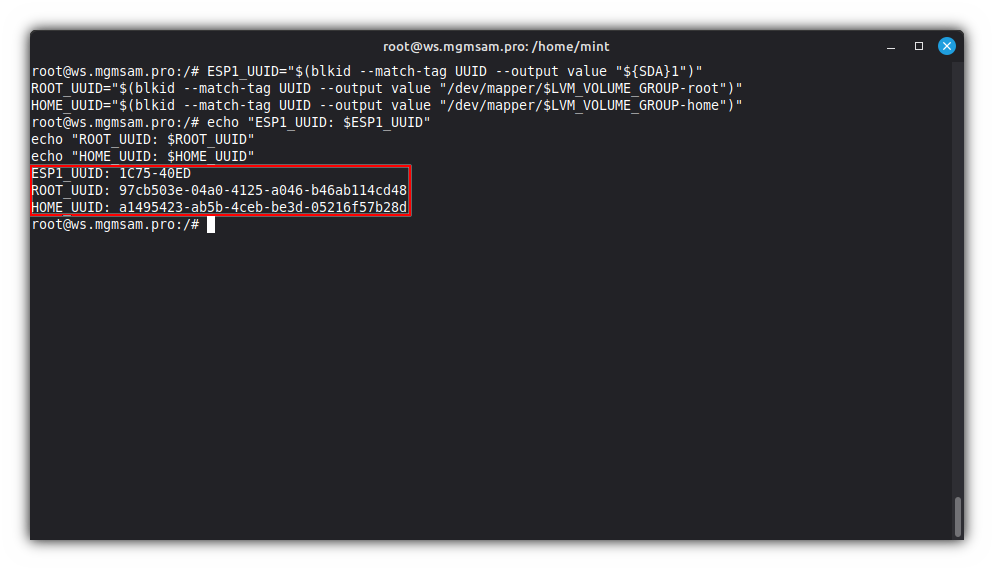
Save the mounting points of the system partitions:
cat <<FSTAB > /etc/fstab
# /etc/fstab: static file system information.
#
# Use 'blkid' to print the universally unique identifier for a
# device; this may be used with UUID= as a more robust way to name devices
# that works even if disks are added and removed. See fstab(5).
#
# <file system>                           <mount point>  <type> <options>  <dump> <pass>
proc                                      /proc          proc   defaults   0      0
UUID=$ESP1_UUID                            /boot/efi      vfat   umask=0077 0      1
UUID=$ROOT_UUID /              xfs    defaults   0      1
UUID=$HOME_UUID /home          xfs    defaults   0      0
$SWAP_FILE                                 none           swap   sw         0      0
FSTAB
Check the
/etc/fstabfile:cat /etc/fstab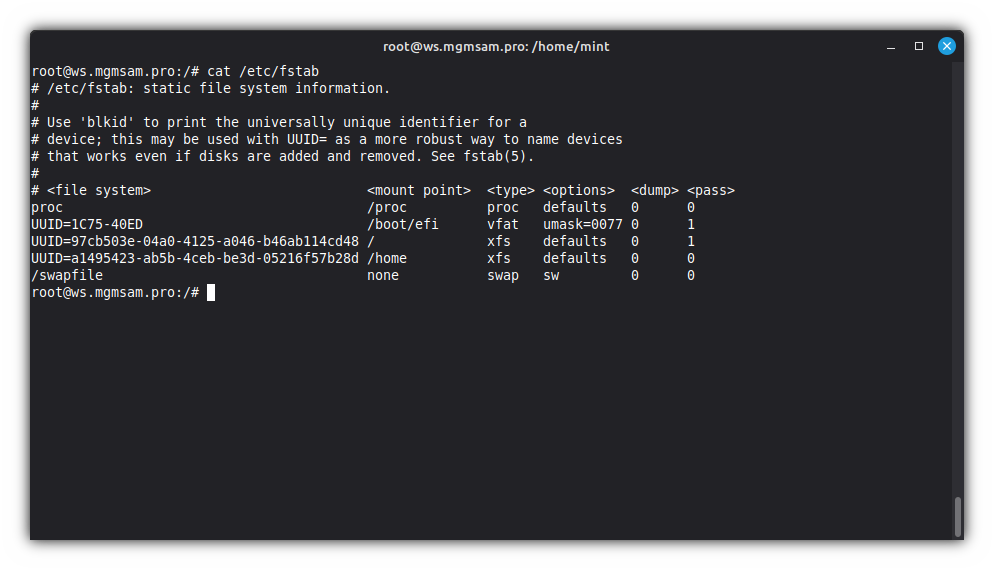
Configuring initramfs
If you follow the steps in Encryption with LUKS2, add some initramfs modules:
cat <<MODULES >> /etc/initramfs-tools/modules
aes-i586
aes_x86_64
dm-crypt
dm-mod
xts
MODULES
If you follow the steps in Configuring LUKS with password and USB unlock, add some initramfs modules:
cat <<MODULES >> /etc/initramfs-tools/modules
vfat
nls_cp437
nls_ascii
usb_storage
libblkid
MODULES
Check the
modulesfile:cat /etc/initramfs-tools/modules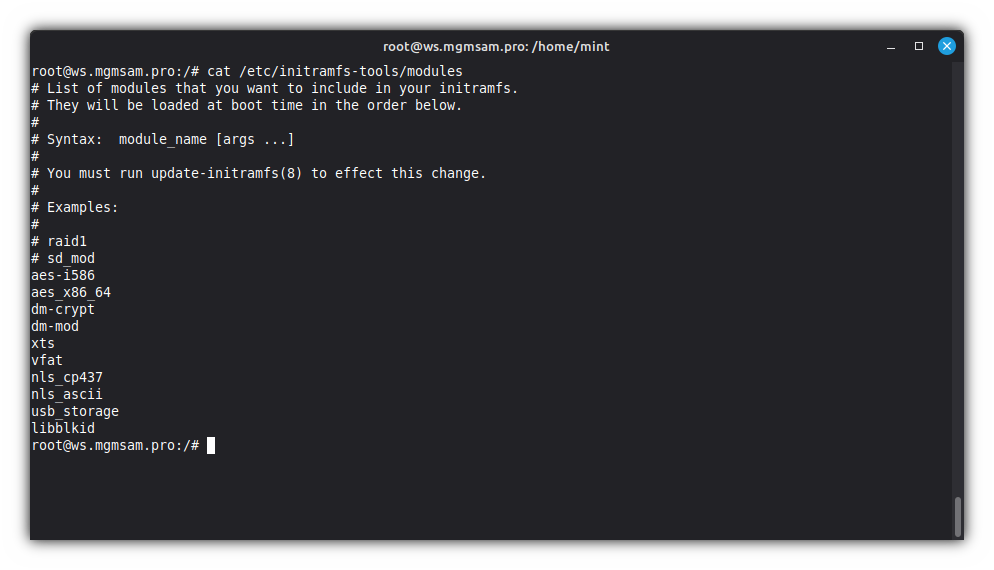
Converting APT source list to Deb822 format
Create Debian source list:
cat <<DEBIAN.SOURCES > /etc/apt/sources.list.d/debian.sources
Types: deb deb-src
URIs: https://deb.debian.org/debian
Suites: trixie trixie-updates trixie-backports
Components: main contrib non-free non-free-firmware
Signed-By: /usr/share/keyrings/debian-archive-keyring.gpg
Enabled: yes

Types: deb deb-src
URIs: https://security.debian.org/debian-security
Suites: trixie-security
Components: main contrib non-free non-free-firmware
Signed-By: /usr/share/keyrings/debian-archive-keyring.gpg
Enabled: yes
DEBIAN.SOURCES
Create LinuxMint source list:
cat <<LINUXMINT.SOURCES > /etc/apt/sources.list.d/linuxmint.sources
Types: deb deb-src
URIs: http://packages.linuxmint.com
Suites: gigi
Components: main upstream import backport
Signed-By: /usr/share/keyrings/linuxmint-keyring.gpg
Enabled: yes
LINUXMINT.SOURCES
Disable
official-package-repositories.list:mv /etc/apt/sources.list.d/official-package-repositories.list \ /etc/apt/sources.list.d/official-package-repositories.list.disabledUpdate list of available packages:
apt update
Configuring secure boot mode
Creating certificates
Install
cert-to-efi-sig-listandsign-efi-sig-list:apt install efitools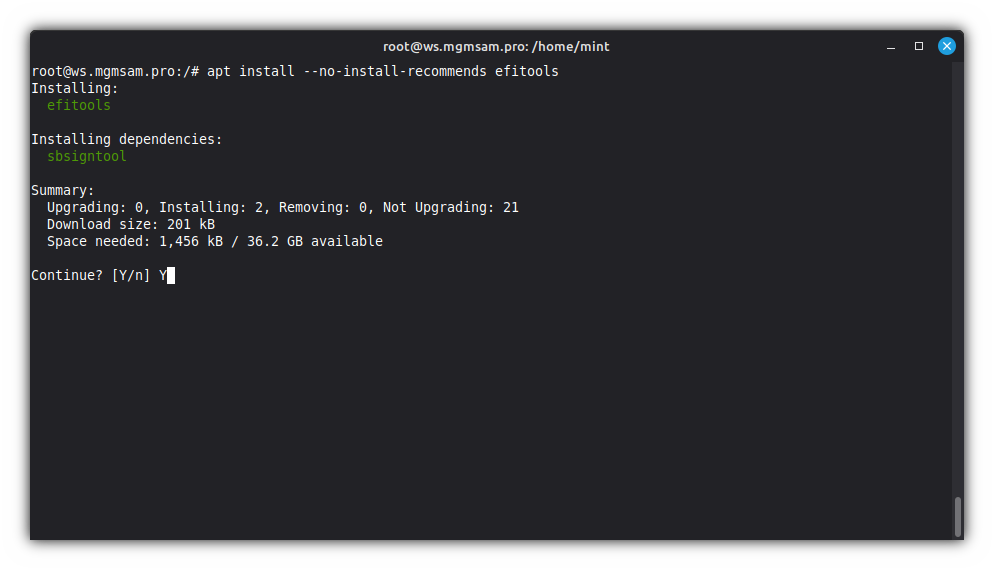
Specify a secure path to store certificates:
SB_DIR="/root/secureboot"Create a directory to store certificates:
mkdir "$SB_DIR" cd "$SB_DIR"
Generate the GUID:
uuidgen > GUID.txtCreate the self-signed
PK:openssl req \ \ \ \ \ 3650 \ rsa:4096 \ "/CN=$DOMAIN_NAME PK/" \ PK.key \ PK.crt openssl x509 \ DER \ PK.crt \ PK.der cert-to-efi-sig-list \ "$(< GUID.txt)" \ PK.crt PK.esl sign-efi-sig-list \ "$(< GUID.txt)" \ PK.key \ PK.crt \ PK PK.esl PK.authCreate the
KEK, signed by thePK:openssl req \ \ \ \ \ 3650 \ rsa:4096 \ "/CN=$DOMAIN_NAME KEK/" \ KEK.key \ KEK.crt openssl x509 \ DER \ KEK.crt \ KEK.der cert-to-efi-sig-list \ "$(< GUID.txt)" \ KEK.crt KEK.esl sign-efi-sig-list \ "$(< GUID.txt)" \ PK.key \ PK.crt \ KEK KEK.esl KEK.authCreate the
dbkey, signed by theKEK:openssl req \ \ \ \ \ 3650 \ rsa:4096 \ "/CN=$DOMAIN_NAME DB/" \ db.key \ db.crt openssl x509 \ DER \ db.crt \ db.der cert-to-efi-sig-list \ "$(< GUID.txt)" \ db.crt db.esl sign-efi-sig-list \ "$(< GUID.txt)" \ KEK.key \ KEK.crt \ db db.esl db.authWARNING: Note that the keys (
*.keyfiles) should be stored in a safe place. If no shim (and no MOKs) will be used, thedbkey needs to be available to the system in order to sign the installed kernels!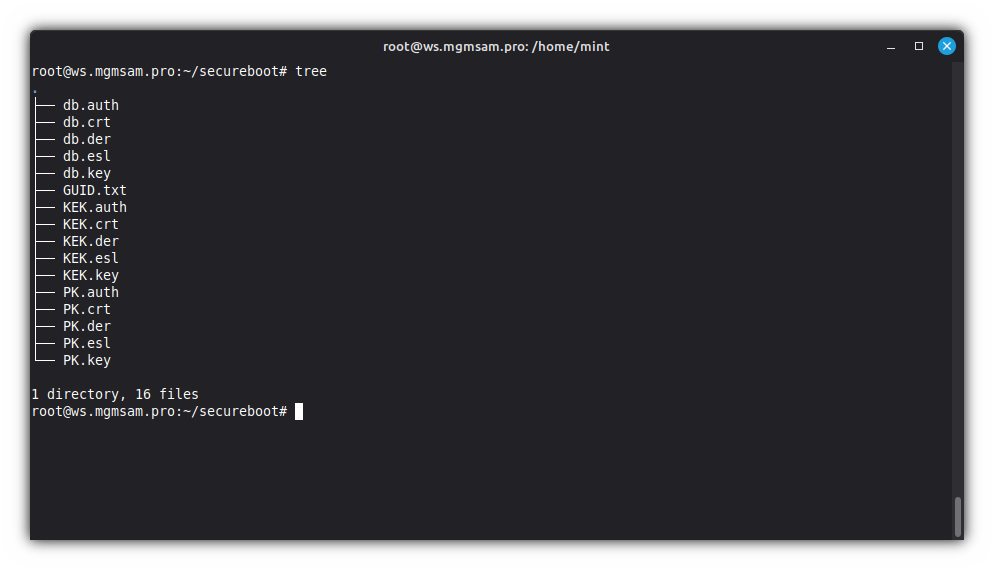
Updating secure variables
Add platform key:
efi-updatevar PK.auth PKAdd key exchange key:
efi-updatevar KEK.auth KEKAdd database:
efi-updatevar db.auth dbCheck secure variables:
efi-readvar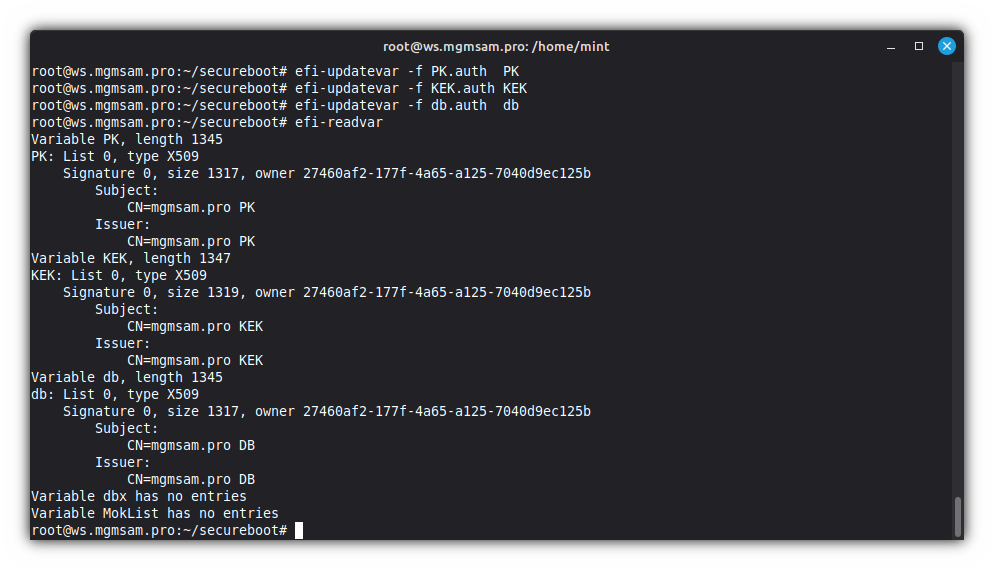
Configuring kernel build
Configure automatic DKMS module signing:
DKMS - Dynamic Kernel Module Support
cat <<DKMS > /etc/dkms/framework.conf.d/$DOMAIN_NAME.conf
# Location of the key and certificate files used for Secure boot. \$kernelver
# can be used in path to represent the target kernel version.
# mok_signing_key can also be a "pkcs11:..." string for PKCS#11 engine, as
# long as the sign_file program supports it.
# (default: /var/lib/dkms):
mok_signing_key=$SB_DIR/db.key
mok_certificate=$SB_DIR/db.crt
DKMS
Check the DKMS Configuration:
cat /etc/dkms/framework.conf.d/$DOMAIN_NAME.conf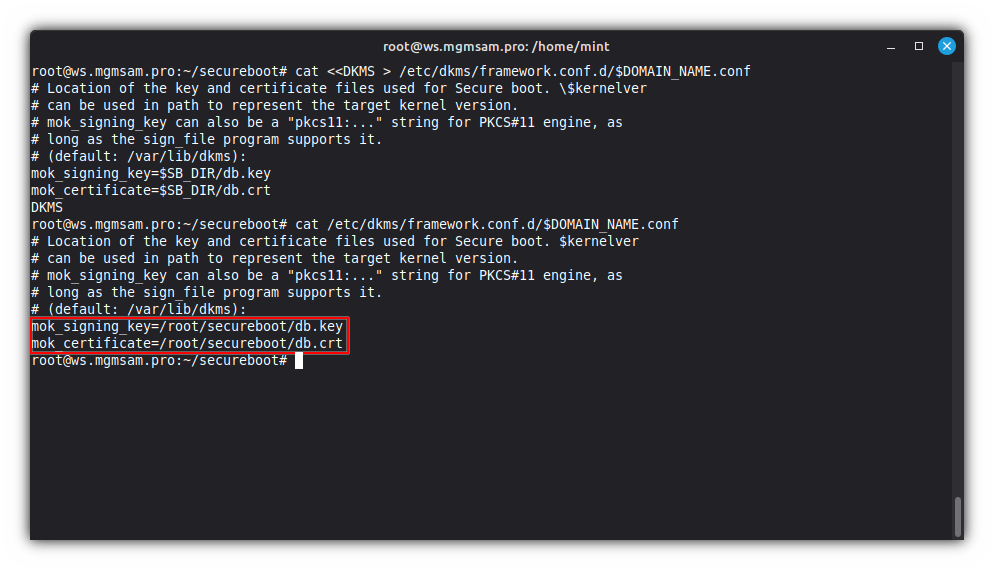
Configure
kernel-install:cat <<KERNEL > /etc/kernel/install.conf # This file is part of systemd. # # systemd is free software; you can redistribute it and/or modify it under the # terms of the GNU Lesser General Public License as published by the Free # Software Foundation; either version 2.1 of the License, or (at your option) # any later version. # # See kernel-install(8) for details. layout=uki initrd_generator=initramfs-tools uki_generator=ukify KERNELConfigure UKI:
UKI - Unified Kernel Image
cat <<UKI > /etc/kernel/uki.conf
#  This file is part of systemd.
#
#  systemd is free software; you can redistribute it and/or modify it under the
#  terms of the GNU Lesser General Public License as published by the Free
#  Software Foundation; either version 2.1 of the License, or (at your option)
#  any later version.
#
# Ini-style configuration file for ukify(1) which is only effective when
# \$KERNEL_INSTALL_LAYOUT or layout= in install.conf is set to uki and
# \$KERNEL_INSTALL_UKI_GENERATOR or uki_generator= in install.conf is set to
# ukify, or is unset. \$KERNEL_INSTALL_CONF_ROOT may be used to override the
# search path.
#
# See kernel-install(8) for details.

[UKI]
#Initrd=
#Microcode=
#Splash=
#PCRPKey=
#PCRBanks=
SecureBootSigningTool = sbsign
SecureBootPrivateKey  = $SB_DIR/db.key
SecureBootCertificate = $SB_DIR/db.crt
#SecureBootCertificateDir=
#SecureBootCertificateName=
#SecureBootCertificateValidity=
#SigningEngine=
SignKernel = yes
OSRelease = @/etc/os-release

#[PCRSignature:NAME]
#PCRPrivateKey=/etc/systemd/tpm2-pcr-private-key.pem
#PCRPublicKey=/etc/systemd/tpm2-pcr-public-key.pem
#Phases=
UKI
Check the UKI Configuration:
cat /etc/kernel/uki.conf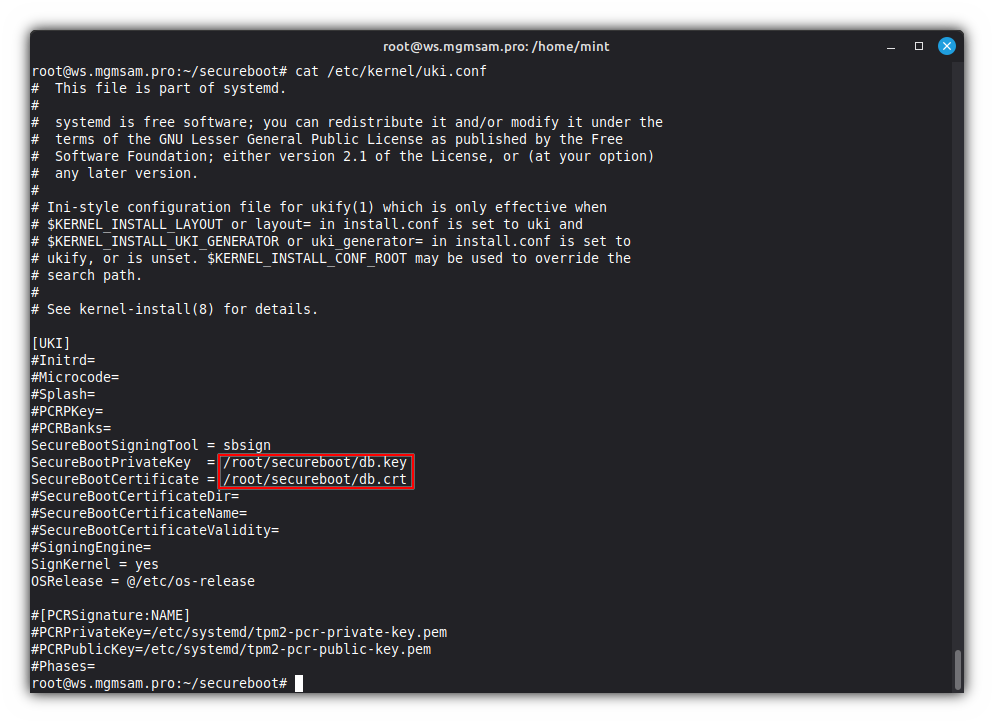
Specify the name of the UKI to be created:
By default, the UKI name is generated from the host's unique ID:
UKI_NAME="linuxmint"echo "$UKI_NAME" > /etc/kernel/entry-token
Configuring kernel command line
Get UUID of RAID device:
RAID_UUID="$(mdadm "${RAID_DEVICE:-/dev/md0}" | grep 'UUID' | awk '{print $3}')"Get UUID of LUKS device:
LUKS_UUID="$(cryptsetup luksUUID "$LUKS_DEVICE")"Get UUID of root logical volume:
ROOT_UUID="$(blkid UUID value "/dev/mapper/$LVM_VOLUME_GROUP-root")"Save kernel command line parameters:
If you require Hibernation, you must disable Secure Boot. The limitations are explained here: UEFI / Secure Boot.
Choose to Set up Hibernation or Without Hibernation
Set up Hibernation
Get the UUID of the swapfile's partition:
SWAP_UUID="$(findmnt UUID "$SWAP_FILE")"Get the swapfile offset:
SWAP_OFFSET="$(filefrag "$SWAP_FILE" | grep " 0:" | awk '{gsub(/[^0-9]*/, "", $4); print $4}')"Check kernel command line variables:
echo "RAID_UUID: $RAID_UUID"
echo "LUKS_UUID: $LUKS_UUID"
echo "ROOT_UUID: $ROOT_UUID"
echo "SWAP_UUID: $SWAP_UUID"
echo "SWAP_OFFSET: $SWAP_OFFSET"
Save kernel command line parameters:
cat <<CMDLINE > /etc/kernel/cmdline
rd.md.uuid=$RAID_UUID rd.luks.uuid=$LUKS_UUID root=UUID=$ROOT_UUID resume=UUID=$SWAP_UUID resume_offset=$SWAP_OFFSET rw quiet splash
CMDLINE
Check kernel command line parameters:
cat /etc/kernel/cmdline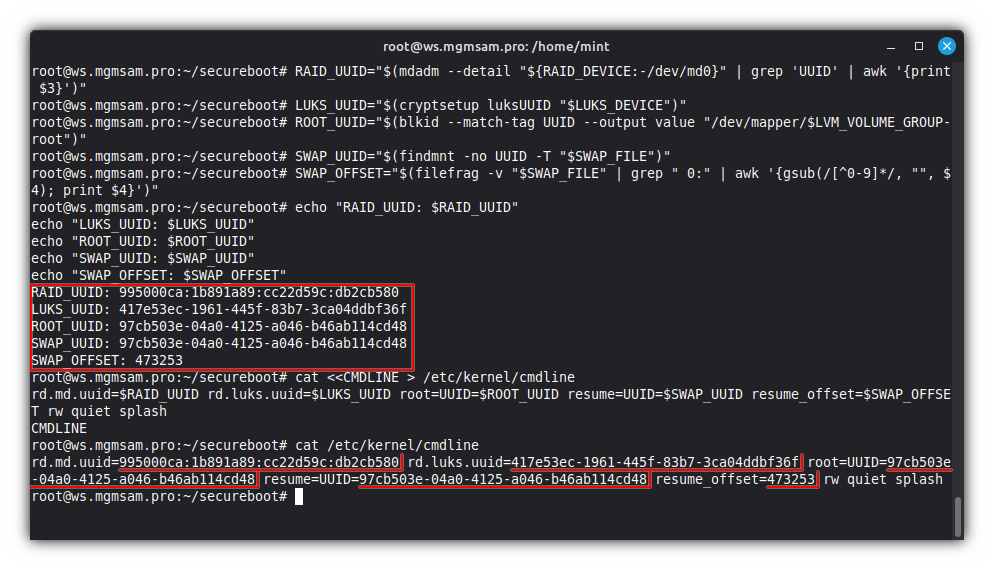
Save the initramfs hibernation parameters:
cat <<CMDLINE > /etc/initramfs-tools/conf.d/resume
RESUME=UUID=$SWAP_UUID resume_offset=$SWAP_OFFSET
CMDLINE
Check the hibernation configuration parameters:
cat /etc/initramfs-tools/conf.d/resume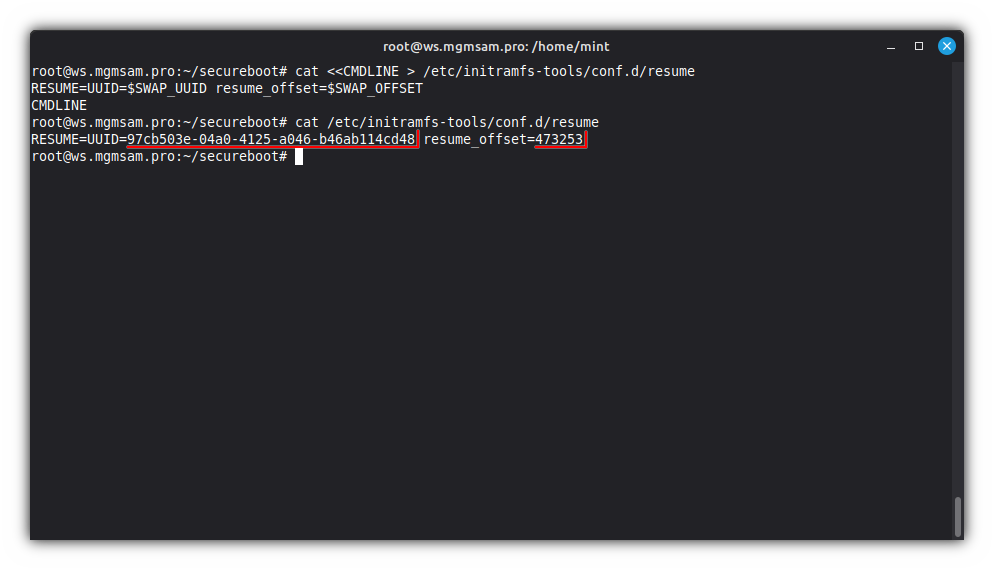
Without Hibernation
Check kernel command line variables:
echo "RAID_UUID: $RAID_UUID"
echo "LUKS_UUID: $LUKS_UUID"
echo "ROOT_UUID: $ROOT_UUID"
Save kernel command line parameters:
cat <<CMDLINE > /etc/kernel/cmdline
rd.md.uuid=$RAID_UUID rd.luks.uuid=$LUKS_UUID root=UUID=$ROOT_UUID rw quiet splash
CMDLINE
Check kernel command line parameters:
cat /etc/kernel/cmdline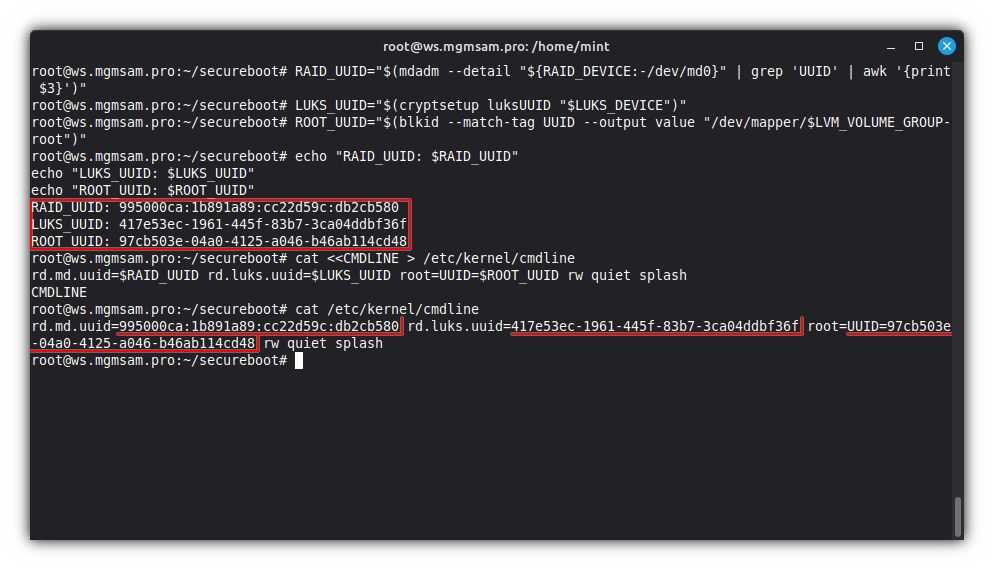
Automatic ESP syncing
Get UUID of the ESPs:
ESP1_UUID="$(blkid UUID value "${SDA}1")" ESP2_UUID="$(blkid UUID value "${SDB}1")"Check ESP UUIDs:
echo "ESP1_UUID: $ESP1_UUID"
echo "ESP2_UUID: $ESP2_UUID"
Create
esp-syncconfig:cat <<ESP_SYNC.CONF > /etc/initramfs-tools/conf.d/esp-sync.conf # Configuration file of the '/etc/initramfs/post-update.d/zz-esp-sync' hook # used after creating the initramfs image. # Specifies a space-separated list of UUIDs for all ESPs that should be # synchronized. In a single-ESP configuration, the variable may be left blank. ESP_SYNC_UUIDS="$ESP1_UUID $ESP2_UUID" ESP_SYNC.CONFCheck
esp-syncconfig:cat /etc/initramfs-tools/conf.d/esp-sync.conf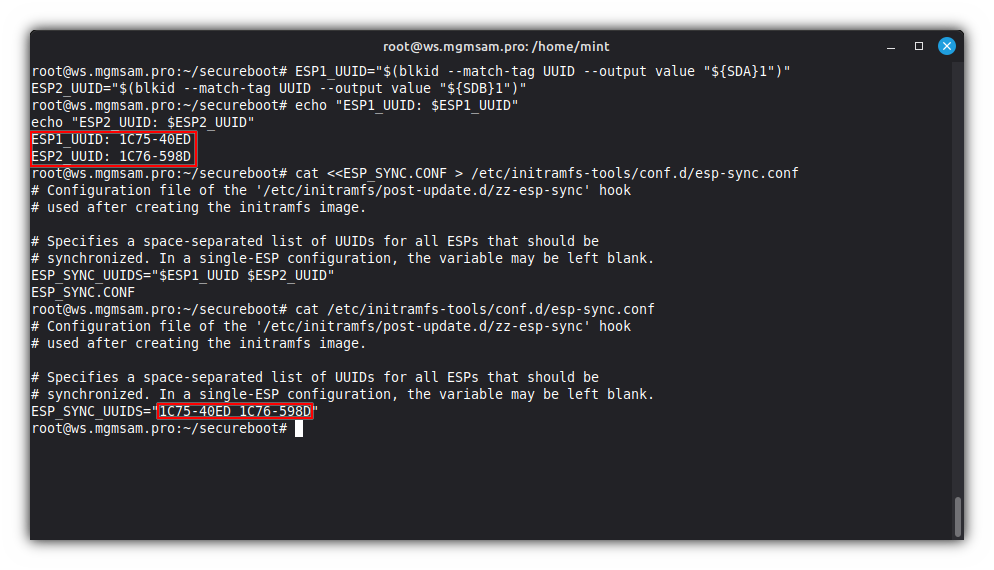
Create the initramfs hook directory:
mkdir /etc/initramfs/post-update.dCreate an automatic ESP syncing hook:
wget "/etc/initramfs/post-update.d/zz-esp-sync" \ https://raw.githubusercontent.com/mgmsam/esp-sync/refs/heads/main/esp-syncMake the initramfs hook executable:
chmod u+rwx,go+rx "/etc/initramfs/post-update.d/zz-esp-sync"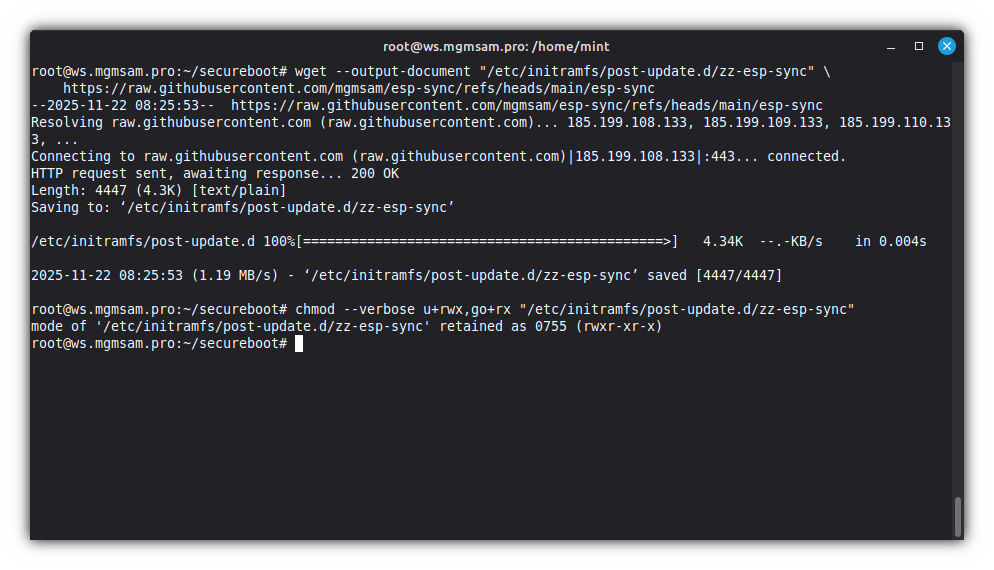
Configuring the bootloader
Install the
systemd-bootandlinuxx64.efi.stubpackages:apt install systemd-boot systemd-boot-efi systemd-ukify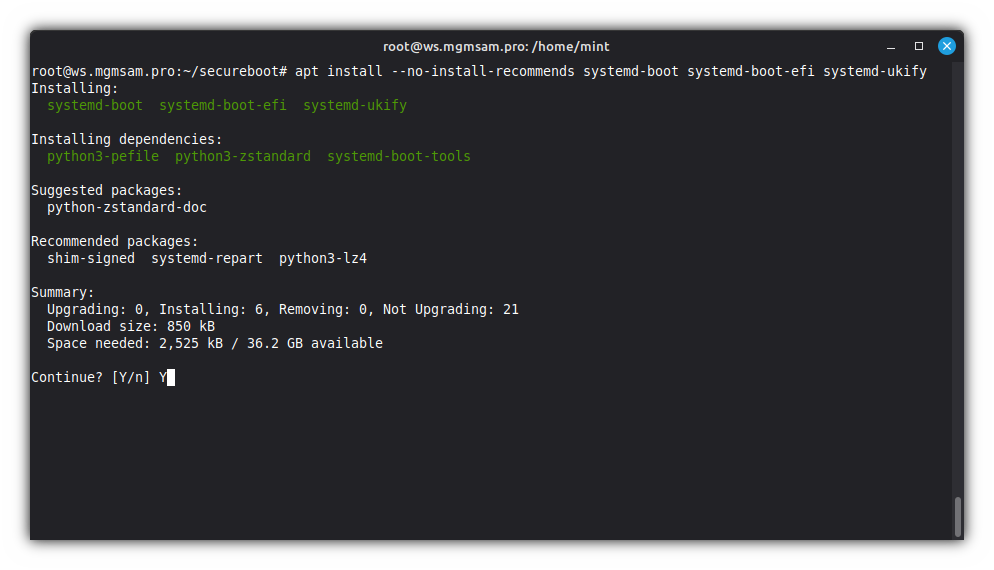
Sign an EFI boot image for use with secure boot:
sbsign \ db.key \ db.crt \ /usr/lib/systemd/boot/efi/systemd-bootx64.efi.signed \ /usr/lib/systemd/boot/efi/systemd-bootx64.efiCheck bootloader signature
systemd-bootx64.efi.signed:sbverify db.crt /usr/lib/systemd/boot/efi/systemd-bootx64.efi.signed sbverify /usr/lib/systemd/boot/efi/systemd-bootx64.efi.signed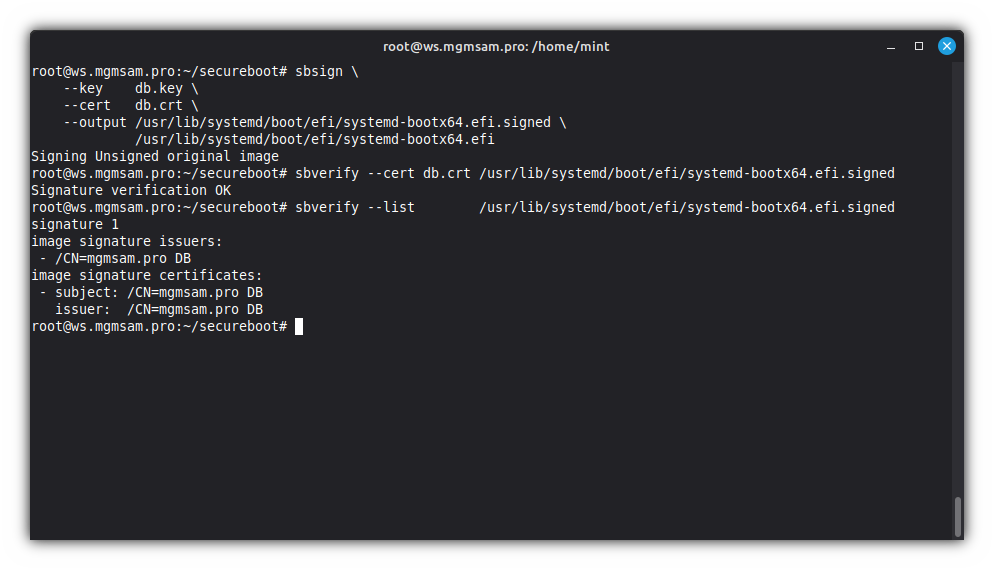
Remove
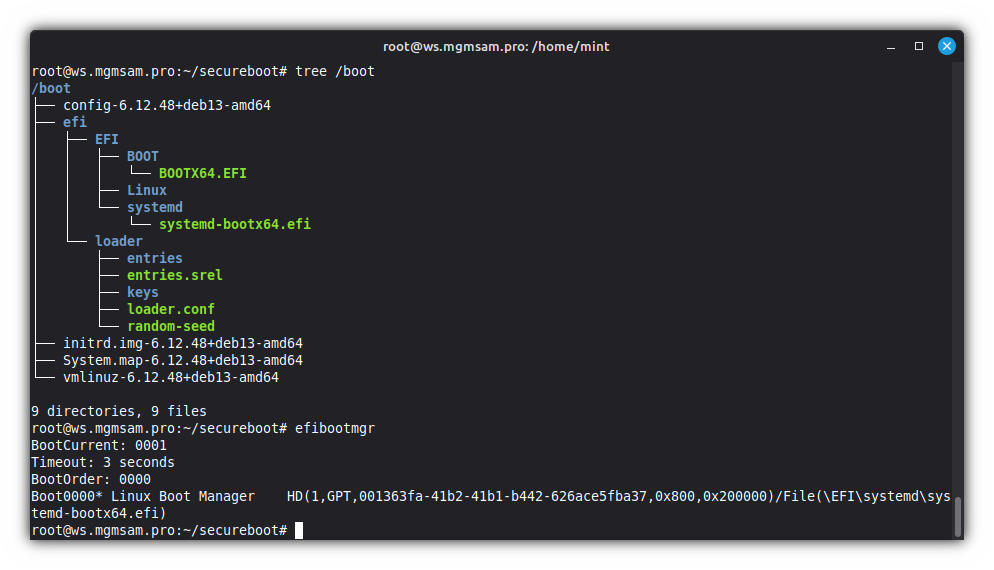
systemd-bootfrom the ESP and EFI variables:bootctl removeList contents of
/bootdirectory in a tree-like format:tree /bootRemove bootloader leftovers from ESP:
rm /boot/efi/EFI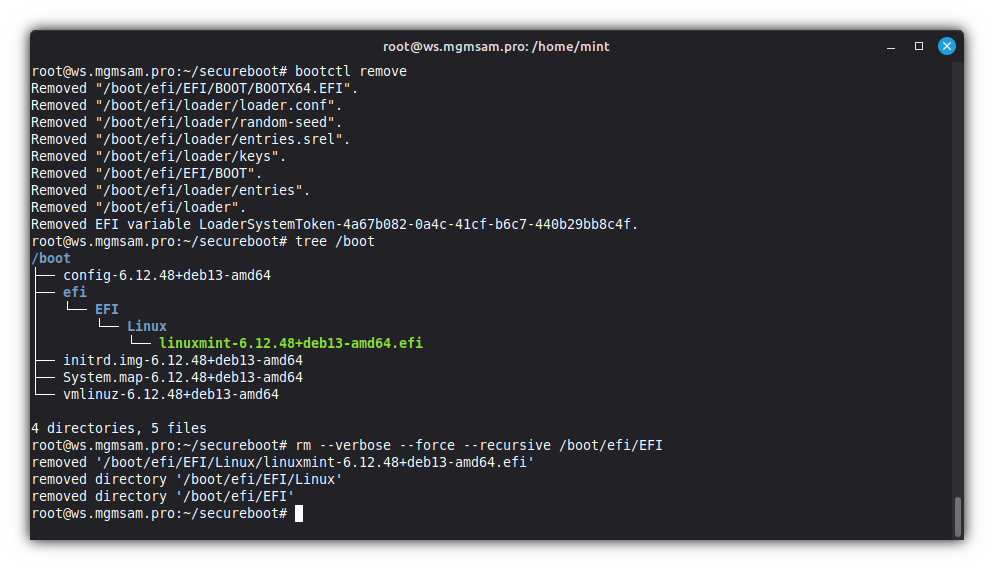
See the UEFI boot manager configuration:
efibootmgrRemove all unnecessary bootloaders:
efibootmgr 0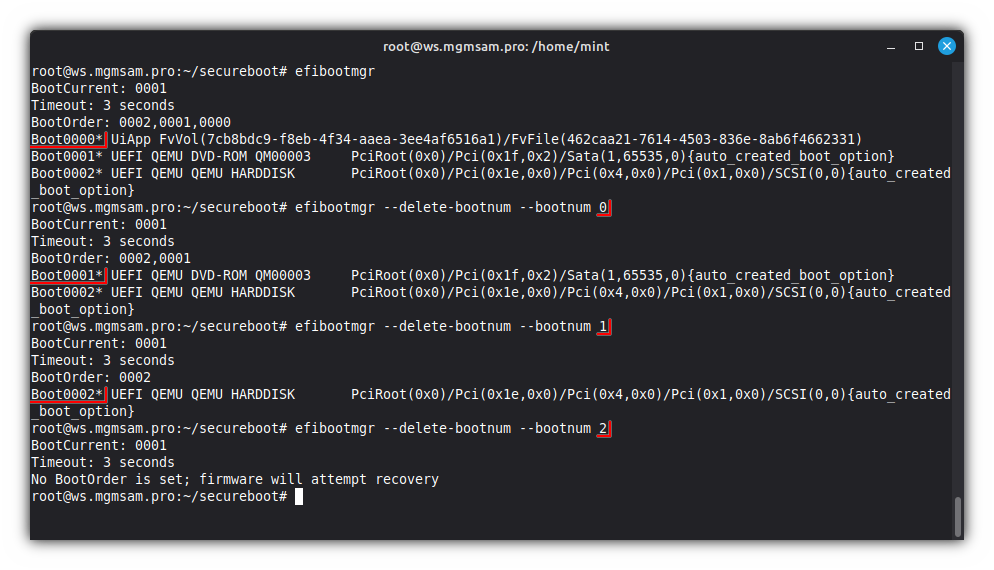
Install
systemd-bootto the ESP and EFI variables:bootctl install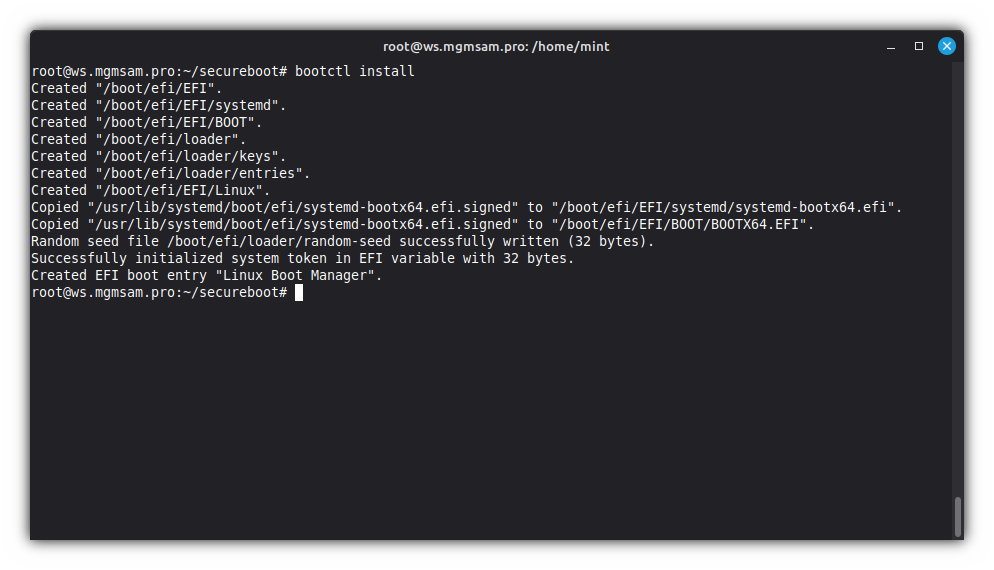
Configure the
systemd-bootbootloader:cat <<LOADER > /boot/efi/loader/loader.conf default $UKI_NAME-*.efi timeout 5 console-mode keep editor off auto-entries off auto-firmware on auto-reboot on auto-poweroff on secure-boot-enroll off LOADER
Updating initramfs
Run
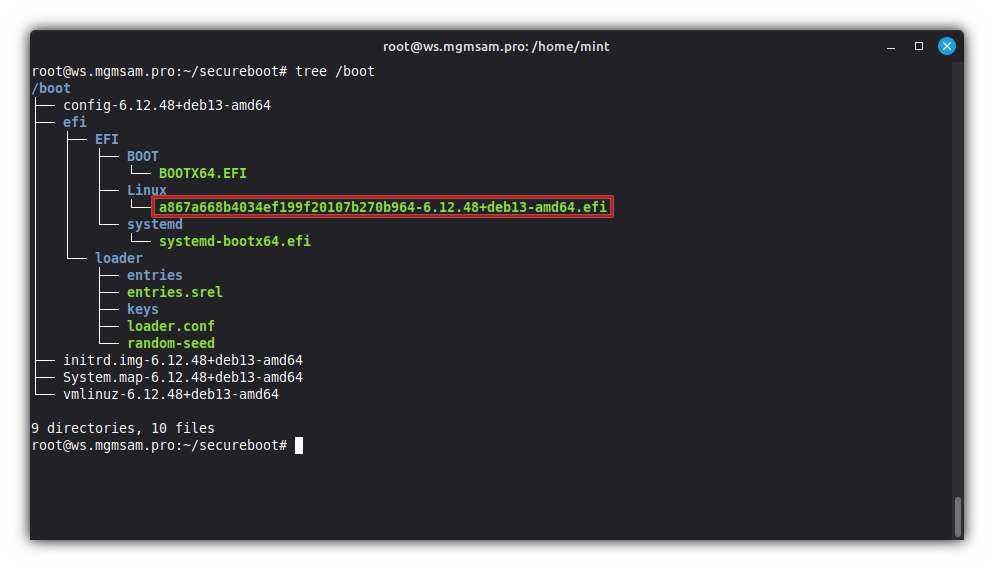
initrdimage update:update-initramfs allCheck for UKI existence:
tree /boot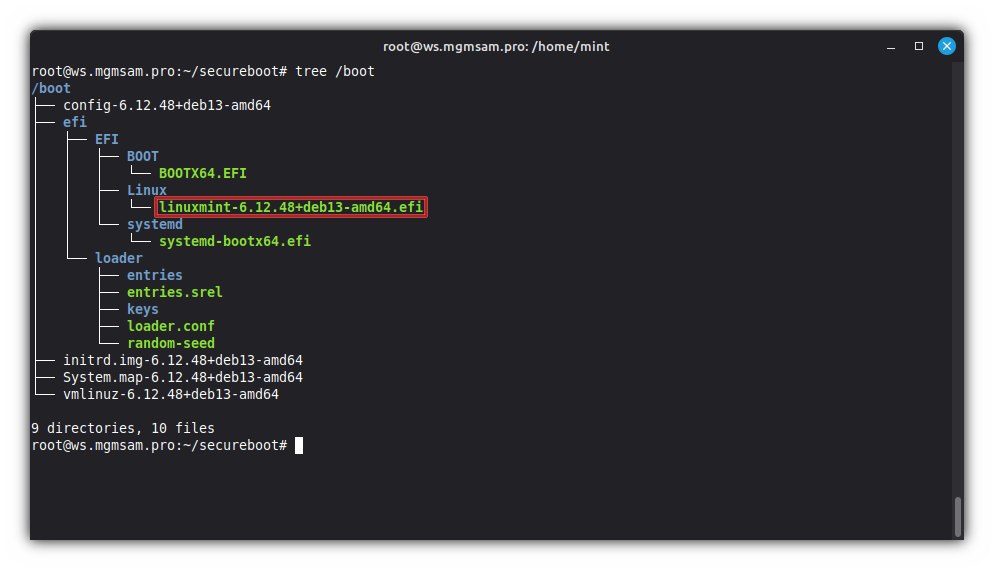
If all UKI variables are correct, you should see it in the boot menu:
bootctl list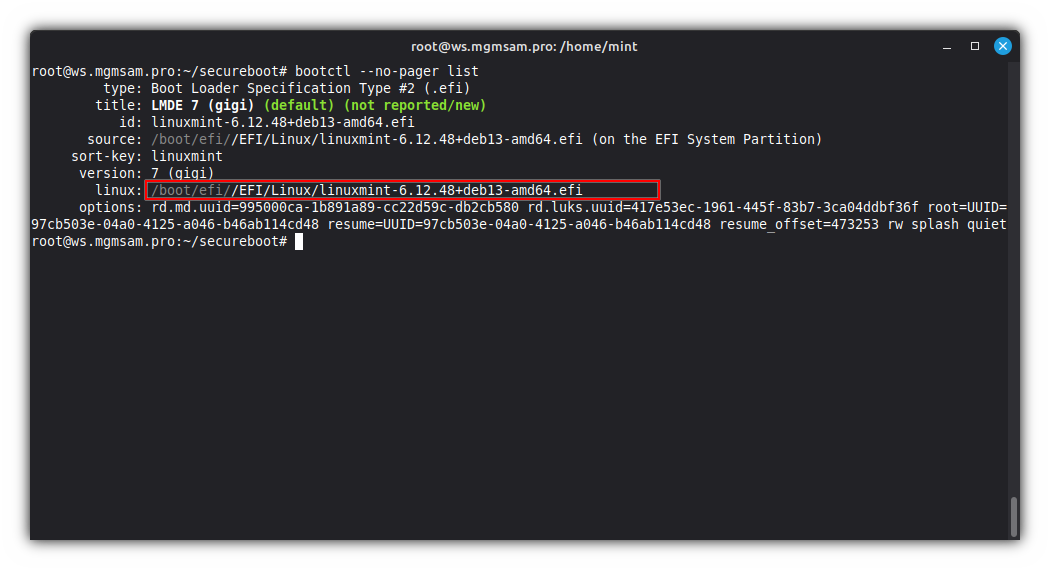
Installing the video driver
Create a textmode UKI:
To solve potential problems arising after incorrect video driver installation, you will find a UKI with a command line that disables all video drivers useful for performing repair work in console mode.
. /etc/os-release KERNEL_VERSION="$(uname )" CMDLINE="\ rd.md.uuid=$RAID_UUID \ rd.luks.uuid=$LUKS_UUID \ root=UUID=$ROOT_UUID \ resume=UUID=$SWAP_UUID \ resume_offset=$SWAP_OFFSET \ rw \ nomodeset \ module_blacklist=amdgpu \ module_blacklist=i915 \ module_blacklist=nouveau \ module_blacklist=radeon \ systemd.unit=multi-user.target"ukify build \ "/boot/vmlinuz-$KERNEL_VERSION" \ "/boot/initrd.img-$KERNEL_VERSION" \ "/boot/efi/EFI/Linux/$UKI_NAME-$KERNEL_VERSION-textmode.efi" \ "$KERNEL_VERSION" \ "$CMDLINE" \ "PRETTY_NAME=$PRETTY_NAME textmode" \ sbsign \ \ "$SB_DIR/db.key" \ "$SB_DIR/db.crt"Provided the UKI is created successfully and all variables are correct, it will appear in the boot menu:
bootctl list
Installing the video driver:
Choose to Installing the AMD driver, Installing the INTEL driver or Installing the NVIDIA driver.
Installing the AMD driver
At the moment, I don't own an AMD GPU, but my next one will definitely be from AMD/the red team.
Installing the INTEL driver
At the moment, I don't own an Intel GPU.
Installing the NVIDIA driver
Install
nvidia-detect:apt install nvidia-detectDetect GPU:
nvidia-detect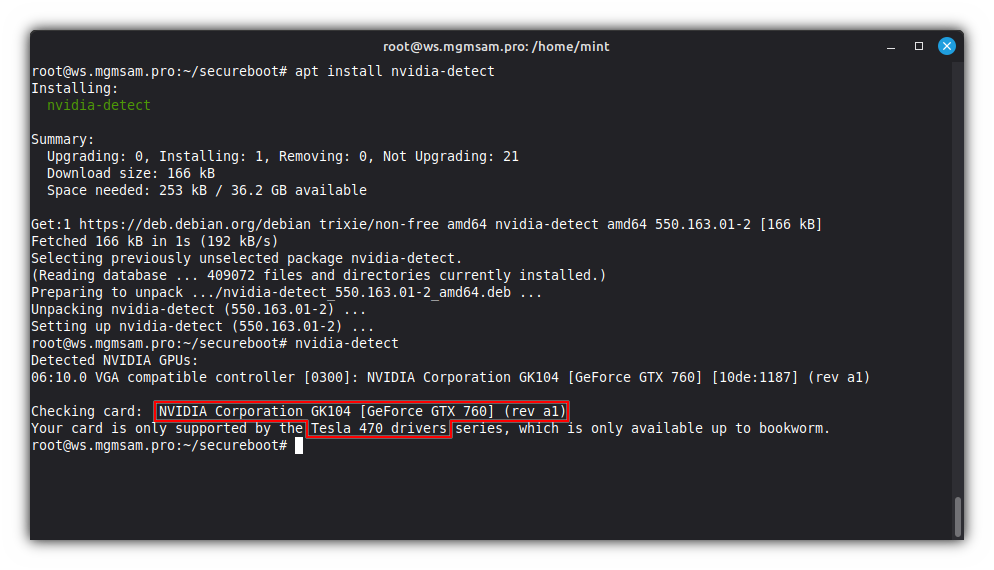
Install the NVIDIA driver package:
Choose to For older video cards (legacy driver) or For modern video cards (current driver)
For older video cards (legacy driver)
Add the Debian unstable repository:
cat <<DEBIAN.SOURCES > /etc/apt/sources.list.d/unstable.sources
Types: deb deb-src
URIs: https://deb.debian.org/debian
Suites: unstable
Components: main contrib non-free non-free-firmware
Signed-By: /usr/share/keyrings/debian-archive-keyring.gpg
Enabled: yes
DEBIAN.SOURCES
Configure the unstable repository priority:
cat <<DEBIAN.SOURCES > /etc/apt/preferences.d/unstable.pref
Package: *
Pin: release a=unstable
Pin-Priority: -10
DEBIAN.SOURCES
Update list of available packages:
apt updateInstall the NVIDIA legacy driver:
apt install unstable nvidia-tesla-470-driver
For modern video cards (current driver)
apt install nvidia-driver
Check NVIDIA driver:
nvidia-smi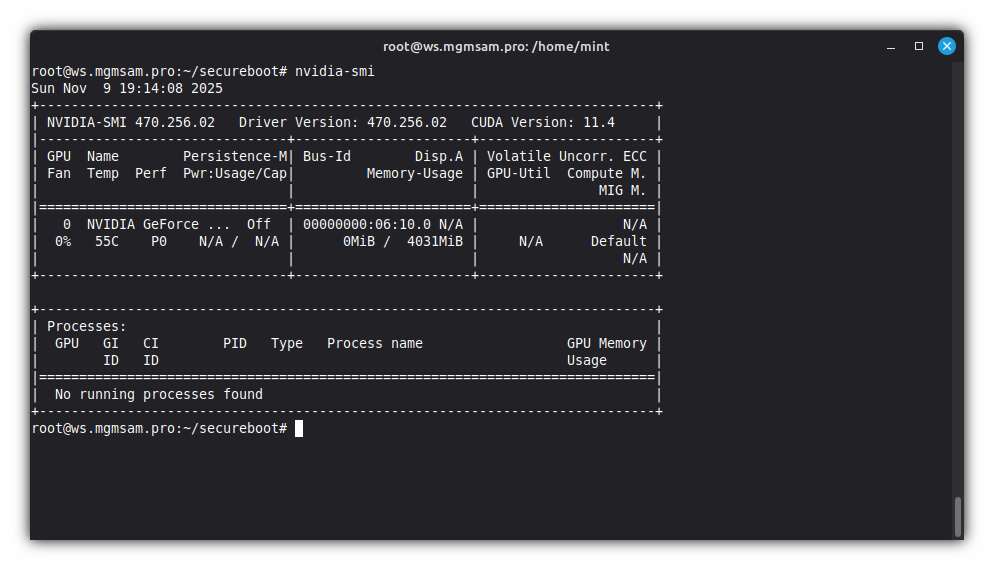
Install the NVTOP package:
apt install nvtop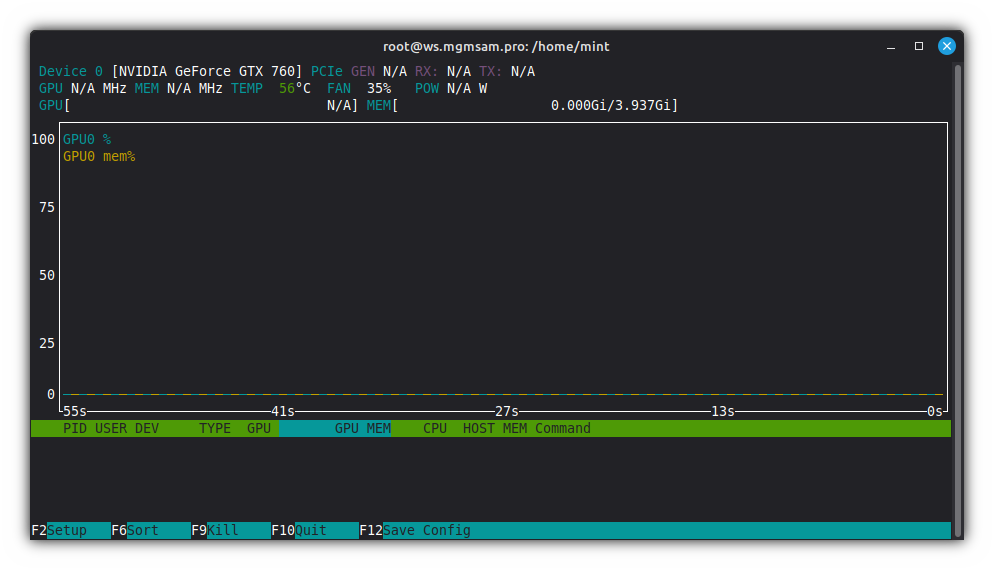
System upgrade
apt full-upgrade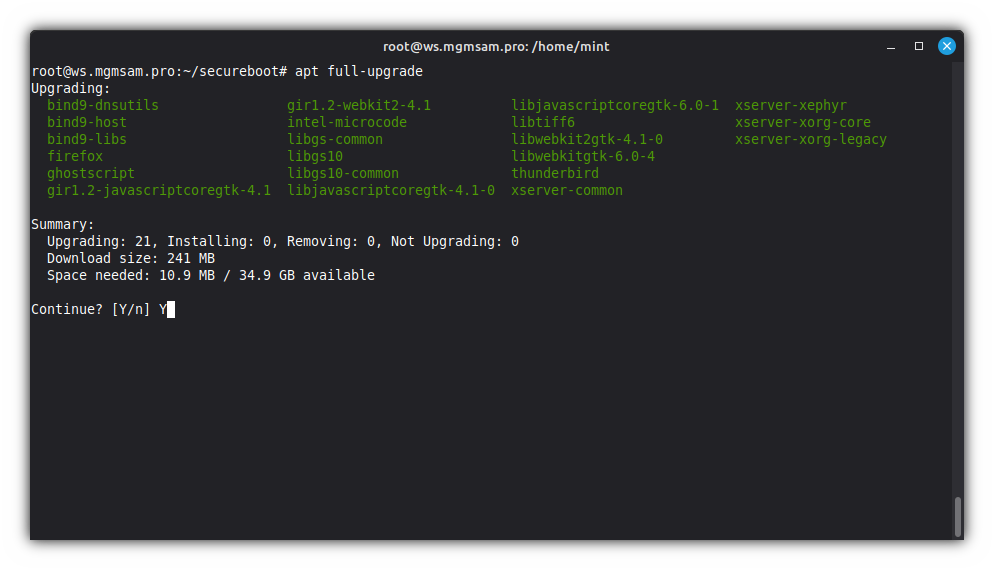
Cleaning APT
dpkgapt autoremove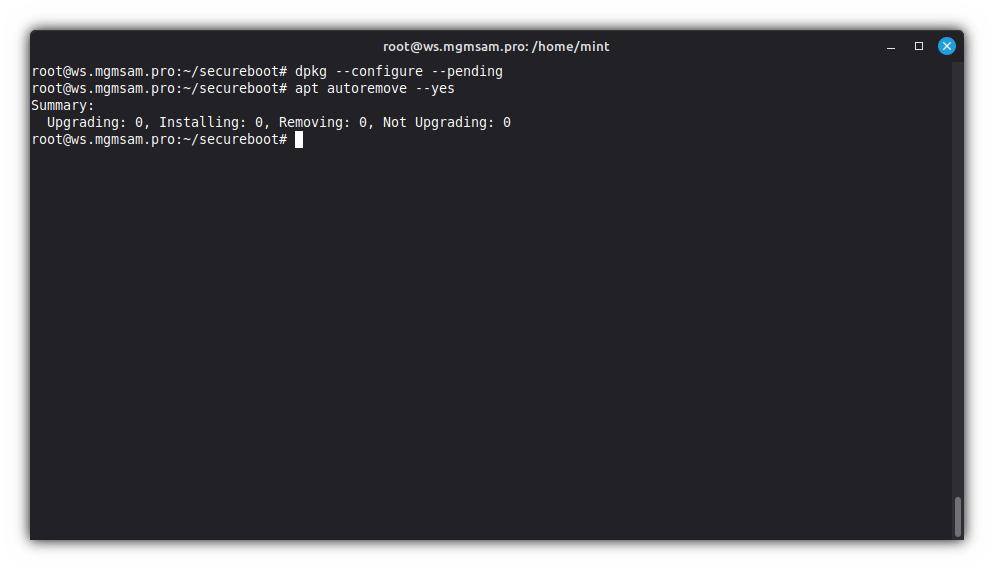
Exiting the chroot environment
exit
Unmounting the file systems of the installed system
Restore the local domain name system configuration file:
mv /target/etc/resolv.conf.bk /target/etc/resolv.confUnmount essential system directories:
for FS in /dev/shm /dev/pts /dev /proc /run /sys/firmware/efi/efivars /sys do umount "/target$FS" doneUnmount the ESP:
umount "${SDA}1"Unmount the home partition:
umount "/dev/mapper/$LVM_VOLUME_GROUP-home"Unmount the root (
/) partition:umount "/dev/mapper/$LVM_VOLUME_GROUP-root"Deactivate volume groups:
vgchange n "$LVM_VOLUME_GROUP"Close LUKS devices:
cryptsetup close "/dev/mapper/$LUKS_NAME"Stop the arrays:
mdadm "${RAID_DEVICE:-/dev/md0}"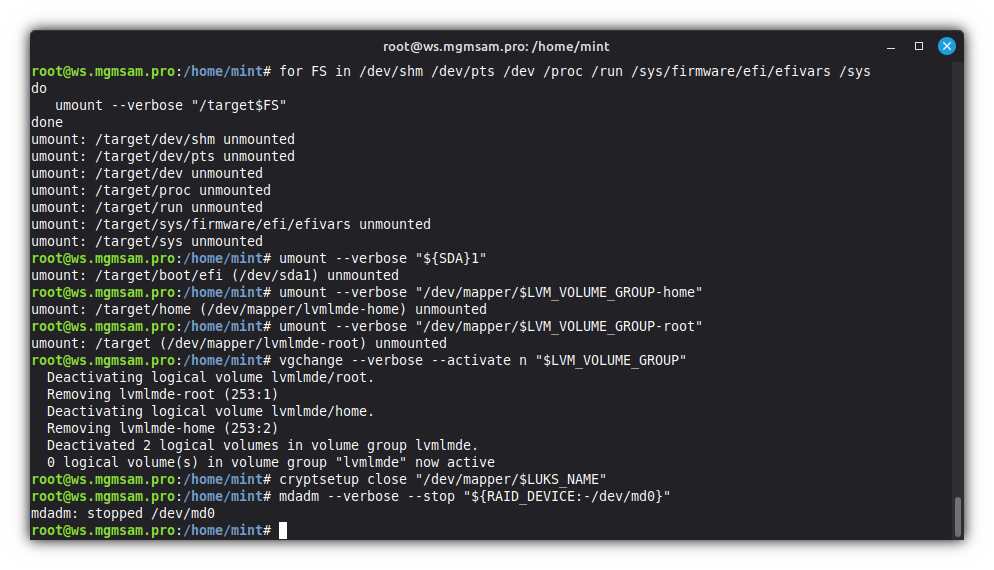
Rebooting the machine
shutdown nowChecking the secure boot certificates
Booting LMDE 7
Boot LMDE 7 with USB key
Boot LMDE 7 without USB key
Using hibernation
Reboot and disable the Secureboot:
Hibernate:
Resume hibernation:
Emergency boot
Useful links
Installing LMDE to nvme mdadm raid
Best order of raid lvm and luks